old4570's blog View Details
Archive for May, 2019
Posted by old4570 | May 30, 2019 @ 08:45 PM | 4,523 Views


Yes , been raining for almost a week now ( most rain we have had in a long time ) ..
Came this morning , one WL Toys F-959 ...
Easy peasy / lemon squeezy ... Just plug in the wings and charge the battery ... Ok !

I also had to trim the rudder and elevator .. Alignment was ?
Other than that :
Engine / prop produce right on about 1:1 power to weight .. Noisy motor but no bad vibrations .
Flying weight is right on about 111 grams .

Factory transmitter blows chunks ! Ever seen a Cow blow chunks , the factory Tx blows chunks like that ..
Ele / Rud are seriously jerky
Motor = First 1/3 of throttle gives you nothing , then suddenly the power comes on .. And motor speed seems to be in 3 stages ( Feels like )
And the Rud / Ele feels the same , like 3 stages of control ( Not smooth at all )

Since the model uses the old Flysky protocol , I bound it to by Taranis Q x7 equipped with a multi protocol module ..

Chalk and Cheese folks ... Night and day , garbage and strawberries .
The difference is simply astounding .. Everything on the Qx7 is smooth ( Motor / Rud / Ele ) .

The battery goes right up the nose of the model , and there is plenty of movement / placement to play with the CG .

I will not fly the F959 with the factory Tx , it just blows .
I already set it up in the X7 .

Bad Weather , rain and more rain predicted + Winds ...
??? When I will get a chance to fly , F959 - Firstar - Ezio ...

MG 800

I saw this...Continue Reading
Posted by old4570 | May 29, 2019 @ 08:36 AM | 4,212 Views


Features:
• Plug and Fly - Just add your battery, radio system and fly
• Ultra tough molded EPO foam airframe
• Simple bolt together construction, no glue required
• Stable flight performance
• Magnetically secured battery hatch
• Loops and rolls easily

Specs:
Wingspan: 758mm
Length: 536mm
Flying Weight: 200g
Motor: 2208A 4000Kv
ESC: 10A Brushless
Servos: 3 x 9g

Requires:
4+ channel Transmitter and Receiver
2S 7.4V 500~1000mAh Lipoly Battery w/ JST connector

Wow , chalk and cheese folks ( Chalk & Cheese )
And I am comparing the Firstar to the Ezio here ...
Yeah , the Firstar is the Cheese and the Ezio is the Chalk ...

Now HK say's you can assemble the Firstar in under 15 minutes , and if you were assembling your 2nd or 3rd , yeah ill pay that .My effort took about 30 minutes , as I was being very careful . I never looked at the instructions , the Firstar was just that easy . There just was nothing to challenge in the assembly process . That's like !!!! 100% Noob friendly .

Now , CG ....
For me a Zippy 850 2s will give me CG at the factory recommended spot , which seems more like a Control line CG spot .
Hmmm , a nonotech 460 gives me a better CG ( to my mind ) and a nanotech 370 gives me , maybe a more rearward CG .I will try both nanotech batteries ...

I measured the current draw @ full throttle and I got some 10.6 amp . Also the thrust seems to be very good and the Firstar might fly around the 30% throttle mark . ( Might ) ... Flying weight with the nanotech 370 is around 207.6 grams ..
All that's left is that flying thing !


Posted by old4570 | May 28, 2019 @ 01:17 AM | 4,263 Views
I guess HK does not really care .. ( I guess )

More problems !


I installed a 4ch Rx ( FS2A ) from Banggood . ( That part was fine ) .
You know , when people say you cant fit a battery in the Ezio , they really mean you cant fit a battery .

One of the batteries listed at HK ( the nano-tech 460 ) , is too large to fit the Ezio ..
I know because I have that battery ...
This leaves you with the smaller 300mAh and 350mAh batteries ...
And a lot of lead to get CG ..

When it comes to battery width , the max might be around 26mm wide ..
There are some batteries that will fit ..................... @ Banggood !
I found some 1s batteries that would have been perfect as 2s , and since they were being sold as a 4 pack ... I ordered a 4 pack . ( Like I need more batteries )

If you look at the pictures , you will see a battery held in place with a rubber band .. This is your other option !
Remove the hatch cover , and use a rubber band to hold the battery in place .. Pictured is a 450mAh of questionable quality .

Oh dear ! Yes , more BS to deal with !
The Push Rod Connectors are garbage ! I guess HK incuded them so you could throw something away .. They really are junk ...

Oh double dear ! Yes , more BS to deal with !
Run up the motor / prop and there is a horrible vibration !
Since I cant remove the prop / spinner assembly ( it's not going anywhere without being destroyed ) ..
I tried to balance the props = No way ! Not happening !...Continue Reading
Posted by old4570 | May 27, 2019 @ 12:26 AM | 5,002 Views


Unboxing & First Perspective


Unboxing :

Admittedly I was impressed when I opened the box , the Ezio seemed to be light , and looked really nice ( in the bag )
But once I started pulling the parts out of the bags , I started to feel that perhaps this was not the best Ezio to leave the HK warehouse .
The first thing that caught my eye was the sloppy covering @ the middle of the wing ( More Soon ) .
Also the hatch , the magnet apparently was not glued to the hatch cover at all .. Not that I can see .

Fitting it together :

Oh the problems , we are talking about a serious PITA ( Pain in the abacus )
1) Wing was broken - hence the sloppy looking covering
2) Hatch cover magnet not glued
3) Wing does not fit the fuse
4) Tail screw does not fit ( Elevator )
5) Ailerons - The screws that lock the control wires ? They dont go in all the way .. It's not the fault of the screws , simply the holes for the screws were either not drilled deep enough or not threaded deep enough . ( @ the control horns )

So what I paid $ for , was a problem looking for solutions .
1) I had to peel the covering , glue and glass the middle of the wing
2) Fit the wing to the fuse VIA some file work
3) Replace the tail screw ( Horizontal stabiliser / elevator )

Still to do
1) Hatch cover magnet - Not a priority
2) Aileron control rod locking screws - To be replaced and ground at the tips so they sit deeper ( PITA to do )

While I remember
...Continue Reading
Posted by old4570 | May 24, 2019 @ 09:17 AM | 5,987 Views
I ordered some F949 flight control boards some time ago .
Finally got around to trying one .

The board offers 4 channels , Thr - Rud - Ail - Ele
To use the 3rd servo , one simply plugs in a micro servo into the spare 3 pin slot . ( Sorry , which plug ? ) ( Measures 4.8mm x 2.5mm )
Anyways , 4ch capability .

Protocol = the old Flysky protocol used by the 9x and other transmitters .
Only fly in the ointment is the need to rebind the Tx to the flight board every time you want to use it .
This is probably because of the Factory Tx , which sends out a bind signal on start up .

Still , a very interesting board for RC projects that might need 4 channels . Especially Micro Models maybe around 500mm span .
The old V911 boards are just about gone , or simply premium priced . A F949 board just might be what the project ordered .

F949 control board (0 min 27 sec)

Posted by old4570 | May 21, 2019 @ 03:29 AM | 4,642 Views


I only had one 5x3x3 prop to try on the Mini Surfer 800
Today I got a package with some new props ..
So of course I had to see how much current they pulled .
Posted by old4570 | May 19, 2019 @ 12:28 AM | 4,622 Views
It occurred to me ...
That part of the problem lies with the way the pod is a attached to the boom .
3 screws holding it in place to a carbon plate ..
So a lot of force is applied to 3 very small places on launch ..

So before a problem arises , why not just epoxy the pod in place ?
Create a much larger area to distribute launch energy into !
Anyhow , that's what I have done with the Raven 990 ..
I fibreglass reinforced the pod , then glued it in ..
When the Epoxy dries , it should distribute load much more evenly over a much larger area .. ( + the fibreglass wont hurt too much - I hope )
That vertical fin is still weak as ! Next time it breaks , I will cut it out and rebuild it with more carbon reinforcing .
Posted by old4570 | May 18, 2019 @ 09:04 PM | 4,575 Views
https://www.rcgroups.com/forums/show...9#post41890549

I have issued a product alert : ( Well - for what ever it's worth )

I removed the pod from my Raven 990 and it has a stress fracture @ the same location as my Mini DLG pro ( where it broke )
Posted by old4570 | May 17, 2019 @ 10:42 PM | 4,098 Views
Well ,

Not that the Mini DLG pro was a particularly good DLG glider !
I mean , the UMx Whip could probably give it a run for it's money .

But ! I may as well try and repair it .

To that end !
1) I glued the pod back together with some thick Cyno
2) I scratched up the plastic surfaces
3) I put some light weight glass cloth inside and out using the thick cyno to glue it down .

I went with the thick cyno - Since it did such a good job gluing the two halves back together .
Hopefully I have a functional pod once more .

I am sure the carbon boom will be far more challenging , it's strength is seriously compromised .
Just trying to think of something .
Do I go to a Spring pull system , eliminating the music wire running on the outside of the boom ?
That way allowing me to do a WRAP around where the wing posts are , adding strength .


Posted by old4570 | May 17, 2019 @ 12:42 AM | 3,991 Views
Yes , the HobbyKing Mini DLG pro suddenly died ...

I went to do a launch and boom it hit the ground ...

What it looks like is the POD snapped in two , pulling the elevator servo forward , giving the DLG full down elevator and Slam Dunsky into the ground .

The wing and tail surfaces are ok .

The boom is severely cracked where the wing mounts ..

The pod , well it's snapped in two ..

WOW !!!
Since the Raven has pretty much the same pod , and same weak plastic , I guess I have to worry !
This is very disconcerting !

Hobby King ! Bite me !

I am currently waiting on some thin Cyno , so will not attempt any repairs just yet .

POD REPAIR !!!

I guess I will just have to scratch the Dickens out of it , and then fibreglass it inside and out ..

CARBON TAIL BOOM !

Will Cyno do ? or do I need to glass it as well around the wing mounts !

Yes , this is very very disconcerting .
Do I repair the Raven before it does a ground pounding landing ? ( I just might have to )
Posted by old4570 | May 16, 2019 @ 12:06 AM | 3,931 Views
HK Mini DLG Pro @ The Sink hole (4 min 50 sec)


Took my HK Mini DLG Pro to the Sink Hole ( local park )
Wow ...

I set this up a long time ago and for some reason the mixes had become corrupted .. ( Flaps not working correctly )
Also I think the CG is too far forward as my elevator is super soft .. ( So I removed some lead from the tip of the nose .
I think my CG was 60mm from the L/E

What I really dont like .. The canopy retention tabs ( They break )
So today I fixed the broken tab on both my HK DLG gliders ... Raven and Mini DLG Pro

1) I took some music wire and heated it red hot then put a hole where the tab used to be
2) Screw in a small screw that will function as a tab
3) Some cyno to hold the screw in place
4) Viola - fixed

HK Mini DLG Pro
Came home and deleted all the functions ( All of them in all the menu's )
Then did the functions all over again ..

Programmed in a Launch function ( Right Aileron deflection )
Also programmed in flaps ...
Everything seems to be working ...
Next time I will have to re-set everything ... ( Flight trim all over again )
Such is life .
Posted by old4570 | May 14, 2019 @ 11:39 PM | 3,593 Views
Rainbow 600 Light Wing ( 93.3 grams Flying Weight ) (1 min 47 sec)


The wind was a PITA , in calm conditions I should be able to fly the Light 600 even slower .
Over all , I found it to be impressive ..
Still using the 300mAh battery for the 112mm CG ..
For Noobs that CG might be too far back .
It was twitchy , especially into the wind . But very flyable !
Everyone should have a wing !
Posted by old4570 | May 13, 2019 @ 09:26 PM | 3,986 Views


Spirit 600mm Wing

A long time ago I made it my goal to build a sub 100 gram flying wing ..
For some reason it became a wall hanger . might have been those DLG gliders .

So today I decided to take it off the wall and go fly ...
Oh the problems !

The FrSky Rx just refused to bind to my transmitter ( yeah , also lost the bind for some reason )
So that ended up being a massive PITA that wasted over an hour of my morning .
Yes, after removing the Rx from the wing I managed to get a bind ..

Some re-assembly later ! and re-mixing functions .
I was ready to go play the CG game ( After all this time - I forgot where it was supposed to CG )
A 300mAh 2s battery seemed to be close .. ( See Pictures )

I went to my CG test area , and gave the wing a Chuck ! , it seemed to be ok ...
Elevator was given 50% Expo , Ailerons had nothing . Flying weight 93.3 grams
300mAh 2s battery ( Still over 8v when I got home )
CG is about 112mm from LE ( measure up against the fuse ) , maybe a little rearward ?

It flies ..
Most of the test flight was 50% throttle ..
There were times the breeze was strong enough to almost take my hat off my head , and at those times throttle had to be increased .
The Wing really got jittery in the strong breeze .. ( Is the CG too far back ? )
It flew well enough in a mild breeze , but I might try a slightly larger 350mAh 2s in the nose .

Over all I have to say the light wing project was a success !
Flying weight was 93.3 grams and the...Continue Reading
Posted by old4570 | May 09, 2019 @ 11:03 PM | 3,848 Views


It's WINDY / it's wet / and I got bored !
Waiting , and more waiting for stuff !
I have two gliders to finish and I need STUFF ! .. The 1.5 DLG needs a Rx , Bixler HLG needs servo extensions .

With the bad weather I got an itch to do something .
So I got on Google images and started looking for a good old fashioned chuck glider design to download .
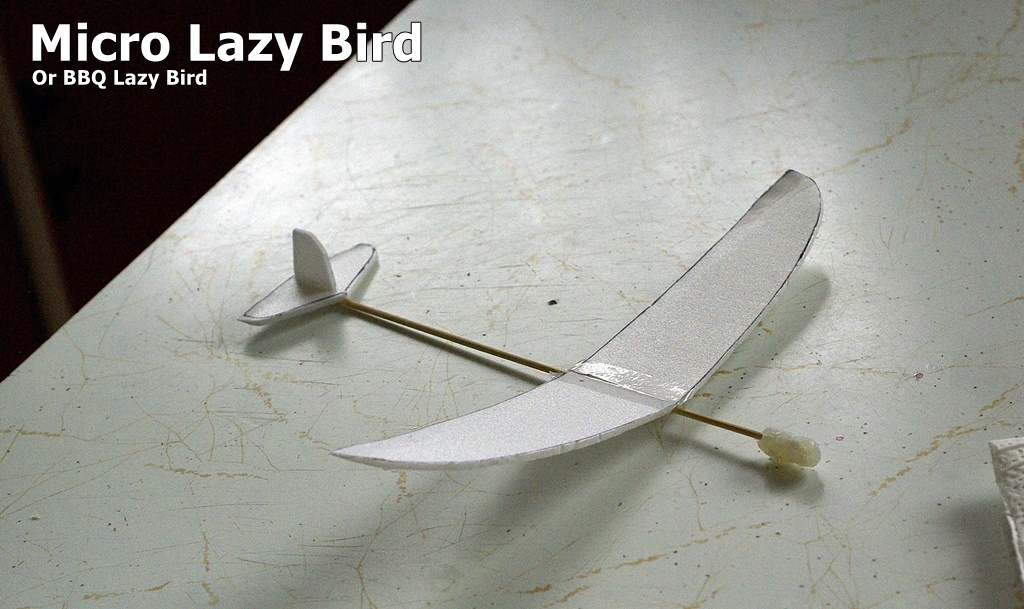
Plan was to go MICRO ...
I wanted to use a BBQ skewer and some 3mm Depron .
The first plan I downloaded was the HAWK , but when printed out ( onto printer paper ) it was just too Micro .
I also downloaded the Lazy Bird plan and when printed out was a really good micro size . Span came out at 255mm !

Project cost = Less than $1
Project time = 1 to 2 hours depending on building exp

This was my first scratch built chucky in 40 years , so I made little effort to make it sweet . This was just quick and dirty to see what was what .

1) Print out the plan
2) Cut out the wing / fins to make templates
3) Draw around the templates on the Depron
4) Carefully cut out the wing etc from the Depron
5) I marked the centre of the wing , then cut partially through
6) I then lay'ed some tape over the other side of the wing and cracked the wing for the dihedral ..
7) I put a line of hot glue into the cut wing and then set it to the BBQ skewer , try and maintain some dihedral doing this
8) Glue the tail surfaces

Now we have to try and get CG ...
I used hot glue for this as well .. In regard to this , I should have left more BBQ Skewer in front of the wing so that less weight would be required for CG .
It glides , surprisingly well for such a small Chucky !

This was a very lose copy of the Lazy Bird , but just a fun little project to kill some time during some horrid weather !
Which continues outside as I type this ..
Posted by old4570 | May 05, 2019 @ 11:04 PM | 4,360 Views
Mini Surfer 800 Take 2 (6 min 16 sec)


https://www.banggood.com/custlink/mDDGrhd0ma > Sent For review by Banggood.com


Here we go > Take 2 !

Most of the flight is 50% to 60% Throttle
Battery is a Turnigy 1000mAh 2s 20 to 30C
Motor pulls about 6amp
When I got home the battery was about 3.99v per cell .

I went back to where I was before ..
So there was a slight tendency to climb under power ..
A 50% throttle it flew reasonably straight ( little climb )
At 60% throttle it was climbing ..
I did a 3 position switch to mix in down elevator , but it was a little too much and I ended up with a slight amount of down .

1) The Mini Surfer 800 when trimmed will fly smooth .
2) It can also fly hands off .. Set it up to fly straight and level and no corrections needed .
3) I did have 50% expo for the flight and I have since set it to 65% to smooth out the elevator a little more .
4) I guess I could do rates as well ?
5) Ailerons are perfect , no expo or rates needed
6) With no Rx issues , the Mini Surfer 800 launches really nice .
7) Cutting power to land there is a very distinct roll to the left , ( I will have to check that )
8) The mini 800 tracks well , turns well .
9) It flies 2s with no issues
10 ) Landings lack excitement
11) Flying weight with the Turnigy = 299.9 grams ( hmmm - on a diet ! , it might make 250grams flying weight )

Not sure the Mini Surfer 800 is a great 1st RC model , might be a...Continue Reading
Posted by old4570 | May 05, 2019 @ 07:35 PM | 3,675 Views
Woke up about 6.30am ...
It was dark , Cool and very Overcast outside .

By the time I had some models in the car it looked like it might rain !

So off I went really early to the flying site .

Mini Surfer 800 went up first ( Video Shortly ) .
This time around I did not try to fly and trim .
I had a 3 position switch set to give me a small amount of down elevator for flight ..

Without the 3 position switch there was just a small tendency @ 50% throttle to climb .
Activating the switch gave me a slight amount of down ...


Which to chose , the lesser of the two evils would be the tendency to climb .
With 50% expo on the elevator ( nothing on Ail ) the mini surfer 800 was very smooth , but it could be smoother .
I have set the rates to 65% on arriving home , and I have lowered the effect of the 3 position switch - down ele mix )

The other model I took along was the HK Mini DLG Pro ..
I have had this for a while and never flown it . ( Yes I have video )
Seems to glide nice .. Though has a tendency to roll into the launch wing . The harder you launch , the harder it rolls into the launch wing . ( Bad ju-ju )
+ The canopy will need some tape , I blew it off on a launch for some rearward CG .. ( Weight is in the nose of the canopy that comes off )