Posted by Trumpern951 | Apr 06, 2024 @ 11:37 AM | 3,477 Views
I recently bought. A Anycubic photon printer
It will not read the stick drive. So I contacted the manufacturer.
So after a few emails ends up the firmware is faulty, and to my surprise they refuse to cover it infact they have no parts to repair the unit and won't replace it so DONT BUY
ANYCUBIC THEY DONT BACK THERE PRODUCTS!
Posted by ahr43 | Apr 06, 2024 @ 10:42 AM | 3,420 Views
Been a busy time both on the bench and at the track since last posting to this blog. Two things drove this flurry of activity. One, disappointing performance of the package as a drag racer and two, a change in track length and elimination procedures.

Pulled the 27T brush motor and ESC and upgraded to a 3250Kv sensorless brushless motor and 120A ESC. Right at doubled its trap speed from its previous 15mph to a more respectable 29.5mph. Still more work to do to get the package up to 43mph break-out speed. May have to go from a 2s to 3s battery pack to get there. More testing and tuning will tell.

Which brings into play the new 66ft track length and elimination package. Doubling the distance brings it into a 1/10 scale 1/8 mile track. Pretty much the standard for today's full-size drag racing sportsman tracks. Also changing the class designation from the old NHRA Altered Class to the newer NHRA Super Comp class designation.

Timing and scoring simplified by the elimination of hand-jamming a break-out speed for each car and settling on a 66ft RC break-out speed of 43mph.

And, and new body to boot. Thanks for looking in and following along. Cheers. -Arnold
Posted by JSKYVOLT | Apr 05, 2024 @ 08:37 AM | 4,104 Views
Couldn't resist following up on this and drove an extra forty miles to get.
Motor looks never run and I need to turn the backplate to match the correct n.v. placement.
Missing one screw and the glo clip and fuel tubing. Been busy fueling wood boiler
And resurrecting Troy Bilt equip., another hobby.
Posted by Lion McLionhead | Apr 04, 2024 @ 10:39 PM | 4,379 Views
The raspberry pi foundation restarted production in 2024 with the 5, after 4 years of being shut down. They showed the 5 running common neural networks 3x faster than the 4 & slightly faster in 8 bit mode than the jetson nano in 16 bit float mode. The jetson nano still runs neural networks faster in any float mode. The only model it might beat the raspberry 5 in is body_25, but there might be a posenet model which finally outdoes that on the 5. When body_25 was degraded enough to run on the jetson nano, it was just about as bad as posenet.

Having ported body_25 to tensorrt, it might be time to port it to 8 bit tensorflow. That would scream on the rasp 5 but it's always been a possibility with any other confuser.

The decision was made to abandon efforts with the jetson nano & burn another $70 on a 5 with 4 gigs since its only purpose is 1 camera tracking program. It's hard to say if $70 is a lot of money anymore but lions generally burn $100/year on an embedded confuser.

There was a final effort to get efficientdet-lite0 working on the jetson nano, but an unknown anomaly in the training kept it from ever running a custom model in 16 bit float at 20fps. It could only run a custom model in 32 bit float at 12fps, after a 4 minute startup time. Raspberry pi 5 can theoretically run the custom model at 24fps in 8 bit mode.

A lot of money went into the jetson nano, creating enclosures, attaching a fan, hacking it to enable USB without ethernet. It only ended up making 2 videos in the field, with body_25.

Jetson speed tests (8 min 6 sec)


body25 heads for the trees (0 min 13 sec)


--------------------------------------------------------------------------------------------------------------
Hard to say if the time could have been spent better than on the jetson nano. Lessons were learned. Calif* is like a convent that votes liberal. You need to make a lot of money to have any kind of relationships, otherwise dating is a waste of time too.
Posted by lincoln | Apr 04, 2024 @ 10:40 AM | 4,522 Views
In no way am I guaranteeing you won't blow yourself up if you try it, but I think I may have a mix that will work with steel Jetex 50 series motors with 1 mm diameter nozzles. (Ha! It's just a hole.) At least I've had a pretty good static test. Possibly slightly less thrust than has been claimed for the original, but not much less. Anyway, more details in this thread:
https://www.rcgroups.com/forums/show...-fuel-question

edit: Due to some reactions of a couple of people who I directed to this post, I think I should clarify. I don't want anyone to blow themselves up. If someone takes up this sort of thing, they should review what the risks are and take appropriate precautions. For instance, I have a polycarbonate face shield, leather gloves, a cotton sweatshirt and so on that I wear during certain parts of this. But I am not infallible. Consult with others.

Quotes from couple of my posts there:

I just made a mix of KNO3, sugar, epoxy, red iron oxide, and tiny amounts of powdered waterglass, brake fluid, and lamp black. We'll see how that works when it sets. 55/17/22/6, in percent, as I recall. Dry ingredients were all milled, the sugar, waterglass and lamp black together, and the KNO3 and red iron oxide together. Then a while blending together without the pennies. This should probably be done away from anything that might burn, since oxidizer and fuel are both present. The epoxy gets mixed before adding to the other stuff. Use slow epoxy and stir for a while. I...Continue Reading
Posted by Aristotle | Apr 04, 2024 @ 01:13 AM | 4,695 Views
Hey y’all!
I’m a foreigner to RC discussion groups so I hope I’m not being rude by making this posting, let me know if I’ve done something wrong by asking, I can take the post down if I’m not allowed to ask the following;

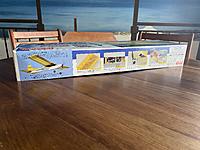
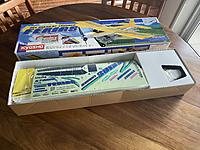
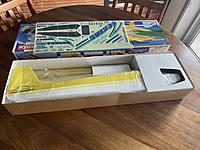
I have a brand new Kyosho Ferias (yellow) in pristine condition. It’s been wrapped up in transport packaging and in my fathers garage for many many years (he was a flight attendant and used to buy things a lot from overseas and bring them back). I’ll leave some photos below.

I was wondering if anyone has an idea of what the plane is worth in this condition as I’ll most likely be looking to sell it?

Thanks everyone!
Kj
Posted by Old_Pilot | Apr 03, 2024 @ 05:37 PM | 4,881 Views
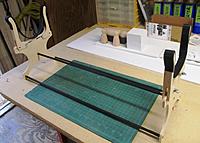
A bit of 6mm plywood, some blind nuts, thumb screws, Walmart arrow shafts, and some Velcro....less than $10.
Drawing is on 36x24 D-size paper plotted 1:1
Posted by autoM8 | Apr 03, 2024 @ 01:09 AM | 5,102 Views
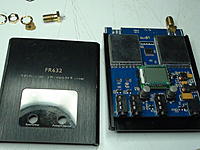
I had my old FR632 sitting in a box for a few years and discovered it recently.

It was in a box because it broke or so i thought, i really liked this vrx and always had great video quality with it with a cp and helical antenna so i thought what's wrong with it and can it be fixed?

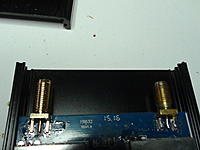
I opened it up and found the sma jack sitting where it shouldn't be..no wonder video didn't work.

I ordered a new sma jack and soldered that on, powered it up and it works again.

Was good to save an old vrx, especially this one and will now be able to use it again for certain locations.
Posted by Boone 870 | Apr 02, 2024 @ 06:32 PM | 5,231 Views
(This post details the modifications I've made to my transmitter that allows me to fly as a quadriplegic and without use of my hands.)

After 5 1/2 years of heavy use and abuse, it is time to retire my DX9 to simulator use only.

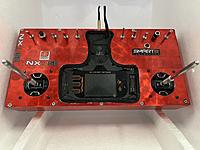
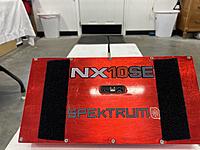
The replacement is a brand-new Spektrum NX10SE that has been modified to fit into a custom-made aluminum case. After un-boxing, charging and updating the firmware, the internals were removed and then the face plate was taken to a bandsaw!

The primary reason I chose the NX10SE was because it came standard with aluminum gimbals. As learned from my first DX6 and the DX9, the standard plastic gimbals do not hold up to the weight and force of my arms banging them against their stops. For long-term use and durability, the aluminum gimbals are a must.

All of the original switches are laid out across the front/top of the new case. The only switching controls that were not utilized in the new case are the sliders, they are stowed away internally because I never use them.

On the right side of the transmitter there are two mono jacks that are wired in to the "A" and "F" switches. They are ran through an electronic relay latching switch that allows me to change the position via a bite switch or a buddy button switch that is attached to the headrest on my wheelchair. There is also a toggle switch that is wired directly between the battery and the transmitter computer that allows me to disconnect the power source and avoid any accidental...Continue Reading
Posted by UpNup | Apr 01, 2024 @ 04:38 PM | 5,889 Views
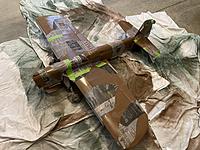
To paint the camo on the RC Nobler with a P-40 look including hard edges, I chose to experiment with masks made of wet newsprint. Note that the plane already had a brown base coat on top and gray on the bottom.

1. Tested to see if the ink once drenched would come off. Nope. I used The Baptist Paper and I had already noticed when reading it that nothing came off on my fingers. Even when thoroughly dry, there were no after effects.

2. Placed newspaper over the plane in sections. I used a red ballpoint ink pen to draw camo lines on the newsprint. **My test using a Sharpie bled through! ** I constantly referred to a 3-view that seemed accurate.

3. I pulled off the sections and cut out the mask and numbered them. The hardest to get right was the section going across the wing, up the fuselage side, around the front of the canopy and down the other side.

4. The plane and masks were taken to the garage. I laid out my drop cloths and placed the plane on it. I also brought out a large bowl of water and a roll of paper towels.

5. The masks were laid out in order. I pushed the paper into the bowl, drenching the paper. I then spread out the masks where I thought they should go. This is more art than science.

6. I dabbed the area to be painted with about four paper towels. Any water that pooled on the masks was also dried.

7. After a thorough check, I sprayed light green coats every 10 minutes over the sections without the masks until the camo sections were fully covered.

8. Remove the newsprint masks 30 minutes after painting. Lay them out flat to dry for future use. Allow the plane to dry for at least two days.

Observations:
:: The green painters tape held even when wet.
:: Anticipate some overspray.
:: Touch-up can be made by spraying some paint into a plastic cup and lightly brushing over unwanted overspray.
Posted by thermaled | Apr 01, 2024 @ 04:24 AM | 6,114 Views
Have had a big clear up in the workshop, clearing my workbench off after using it as a shelf for a while to dump stuff. Now have a decent camera, picked up some desk lamps from ikea to light up the workbench and set up a camera mounting system from 3/4" threaded pipe which hangs from the ceiling. It is a neat way to get good camera shots of my builds without my fat little fingers getting in the way, will be trying it out on my next video.
Yes, back to making videos and attempting to revive my YT channel. Walked up to my local SW slope for a quiet fly with my Ahi, another flyer turned up with a 5m GP15 so filmed him for a while before having a play, you can see that one here:

Ahi RC Glider Slope Soaring on my Local Hill (17 min 33 sec)


Have had some stuff delivered to get busy building again, and filmed the unboxing:

My RC Glider Workbench and some Unboxing (10 min 36 sec)
...Continue Reading
Posted by GRW3 | Apr 01, 2024 @ 01:47 AM | 6,129 Views
I’ve had a set, metric and SAE, of Fox prop reamers for decades. They work well, I keep them in might flight tool box. That box is really oriented to glow. I decided I needed an electric oriented tool box too.

Electric planes need props, props need reamers. I got a set of Great Planes reamers from Tower (still available, BTW). Each one packed in its own container. Unlike the Fox reamers, the twist bar is not permanently attached. Without the bar, the reamer body will Chuck up into a portable drill.
Posted by Lion McLionhead | Mar 31, 2024 @ 08:38 PM | 6,173 Views
Leash Hangup (1 min 9 sec)


Eventually, the truck started randomly stopping under leash control. Then noted it would sometimes erratically turn. The initial theory was an intermittent serial connection or broken wire. Then noted it would sometimes not stop because the leash wasn't retracting. The leash was intermittently not retracting. This created random amounts of slack. When slacked, it would turn randomly. When it turned sharply, it was programmed to slow down so that was why it was randomly stopping.

A teardown showed some bits of dirt but cleaning it made no difference. It was still randomly hanging up. A video showed when it hung up, it would bounce up & down before continuing. It hung up during extension as well as retraction. Removing the dirt might have gotten it to more consistently retract. It didn't glitch after cleaning.

It was intermittently riding up & over some obstacle. There was no way to see an obstacle or where it slowed down. The camera could only see the bounce over the obstacle. The next step might be creating a transparent enclosure. The leading theory is the hot snot holding the magnets or sensors has shifted. Another theory is a piece of dirt is in the cavity where the spring is.
------------------------------------------------------------------------------------

Noted losses of steering control creeping back up. This time, it just stops taking any steering commands but doesn't veer left. It only happens during slow speed. Throttle still works so it's not the radio. It could be get_motor_reverse() rapidly toggling instead of giving a constant value.

This problem evolved until 9 times out of 10, it wouldn't go sharp left. It happened more often in hot weather. It would go slow left. Looks like the ADC on the transmitter continues to be very nonlinear. Left deflection was previously 58. Right deflection was 72. Left deflection might have to be down to the 30's, which doesn't leave any margin for slow left.
Posted by uncleglenn | Mar 31, 2024 @ 04:21 PM | 6,002 Views
Wasnt sure about this one going in. However,Turned out pretty interesting! Depending what you were hunting Some really good deals.I like older prebuilt planes. Usually Strip out the guts and fuel motors. Redo with modern electrics. 9 times out of 10 the build quality sets the tone for how it will fly. Here is one. Sig Seniorita Thin fabric covered 'No fuel stain" Went old school for this antique. 15 direct cobalt 3 cell lipo with Electrifly lipo brushed speed control.These controllers were forward thinking. Has a button wired that you push to turn on control which beeps then you go to full throttle it beeps then back to zero third different tone which arms the controller! Lipo voltage cut off. Maiden today. Just love it.
Posted by Knife Liddle | Mar 31, 2024 @ 01:52 PM | 6,686 Views
THREAD PURPOSE/ MISSION STATEMENT

For those who don't know me, I've been heavily involved with EDF flying since 2007, about 17 years at this point. My more specific intrest is in making an EDF jet go as fast as possible. That's why I lean heavily towards the sport jets instead of scale. So, enter the latest sport jet offering from Freewing, the Zeus.

I've been waiting on something like this since the Taft Cobra became unreasonably expensive for us here in the US. So, as soon as I saw it I hit the buy button for an ARF+ and have since then bought a 6s version and most of the foam parts for another airframe.

I decided that if I could get the Zeus to go close to 200mph with reasonable modifications, that I'd do a blog thread to consolidate all of the modifications that I've tried and try to decide how much each helps contribute to speed and durability.

Last weekend I recorded a GPS reading of 208 mph when adjusting for wind, so I'm beginning my thread. A lot of the early posts here will be things I've already posted in the main Zeus thread, but of course they get scattered and buried in a long thread. So, eventhough these mods may not be in any particular order, they will be easier to refer back to and easier for new readers to find.

***Note*** Please feel free to ask or comment on anything related to the topic. However, from time to time, I'll likely go back and clean up the thread by deleting posts that I think have outlived their relevance.
Please don't take it personally. I just like to keep a thread like this as clean and simple to navigate as possible.

I hope you enjoy following along and find the thread positive and useful. Maybe you'll learn a new trick or two. I'm sure that I will based on additions from others.

Thanks, Enjoy, Lee
Posted by unboxingexp | Mar 31, 2024 @ 11:28 AM | 5,255 Views
Posted by kitchenman | Mar 30, 2024 @ 09:25 PM | 5,681 Views
Have 3 dirty birds. 4 in my life. 1st when I was 15…. Now 65. The maiden on the first ended poorly as it took out the cornstalks, ground, broke the GoldHead block and some other disasters. That said, we’ll chalk it up to EK Logic radio or dumb kid… or both.

Now, smarter and older i started an upgrade of a used ARF. Or maybe its a built kit. Foam wings and glass body…mechanical retracts and no momo. Otherwise it was stellar with some hanger rash and dents. Since i have been out of the plane hobby for decades this plane is a mule so I can LEARN.
Let the re-build begin.

Goals:
  • Keep it light, use little to no ballast . It either adds speed or longevity.
  • Keep it smooth so its faster…
  • Use this as a test bed before building the NIB ARF or recently scored DB… dove to Naples FL. to grab that!!
  • Establish a modular system where elements can be removed or moved to tweak performance... this came later os the build progressed.

STEP 1:
Tank must be on CG. I get the fuel draw issue, but were smatter today and have more options.
Was able to fit a 350 water bottle style tank on a rail system using Sorbothane as the isolator.
First with a 3 line UNIFLOW balanced system, check valve at the pipe.
2 cycle motorcycle filter as the sub tank just behind the firewall
Easy fill fuel dots are a must, one for fill and empty and other as a vent.

STEP2:
Add electronics of the day
Frsky X20s with SR8 and 900 MHz redundancy
ProModler...Continue Reading