
Comments (2)
Add Comment


-
SBach342-26-base.pdfBase for the plans, as found on the web. Dimensions are "as close to wing span 100cm" as I managed to scale the drawings in my CAD program. :)(28.4 KB)292 views
-
SBach342-26.pdfAll parts, except for the obvious ones.(53.1 KB)336 views
-
sbach342-24 - all modifiers applied.blend.zipBlender 3D definition. All modifiers *should* already be applied here.(622.7 KB)337 views


 ).
).


 That brought me to 1060g - still nice, but I'm kind of disappointed I have to carry dead weight around.
-
 Views: 247
Fuse. The two orange tubes are antennas. -
 Views: 237
Cramped electronics compartment. I enlarged the original OSG plans considerably, and yet I was har pressed to get all the stuff in -
") Views: 227
Views: 227
Battery compartment. Those shiny plates behind the motor are ballast (140g of it) -
 Views: 216
Bulk-head is still depron. The fuse walls are 3mm depron sheeted with 1mm balsa using UHU POR -
 Views: 245
I got some fancy-pants push rods with a snap-on mechanism. DIdn't like it, cut it of and went for a trusty old connectors. -
 until it felt right.") Views: 210
Views: 210
Silicon hinge. They are just GREAT! The horiz stab hinge turned out a bit too thick, so I put cuts to it (5-6mm at a time) until it felt right. -
 Views: 263
-
 Views: 223
M6 nylon screw to hold the trailing edge of the wing.
-
 panel.") Views: 276
Views: 276
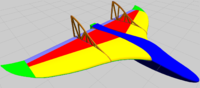
Wing in all its' glory! The outer panels are still not glued to the main (middle) panel. -
") Views: 269
Views: 269
The end of the wing (upside down) -
 Views: 319
At main chord -
") Views: 256
Views: 256
No "waves" no more! :) -
") Views: 278
Views: 278
Almost perfect! :) -
 Views: 285
Test-run with balsa. Shortened the burned parts of the EPS, replaced them with 3mm depron, and sanded Depron down as far as I could. At the thinnest position, the balsa shimmers through. -
 Views: 255
This is NOT the TE of a S6063, but I hope it won't make much difference. -
 Views: 266
The test segment from below. Gotta get rid of this headache before I'm ready to smell some more UHU Por! :D


-
 Views: 245
As you can see, I moved the fin a bit towards the nose. That way I only had to cut into the rudder, as shown on the plans. -
 Views: 249
Detail photo. -
 Views: 251
From below -
 Views: 246
This is still just a "dry fit", so I am still able to pull the whole construction out -
 Views: 247
Another view -
 Views: 243
Here you can see how I moved that fin towards the nose of the plane - by cutting a slit into the horizontal stabilizer -
 Views: 245
I also had to cut some foam out from tail section to accomodate for the fin, which now reaches "into" the fuse. -
 Views: 245
From below.
-
 Views: 322
Templates for my hand-held hot-wire foam cutter. Made out of 2.5mm balsa, and carefully sanded down to be as close to each other as possible. -
 Views: 260
My 5cm Blue Foam sheet was somewhat too short, so I had to cut out a part and extend it a bit. It seems UHU Por holds like hell on this material! -
 Views: 272
Here it is - the monoblock! I'm not quite sure whether it was really necassary to cut out such a big part in the middle, I might put some foam back, to make it more crash resistant -
 Views: 268
Another view of the monobloc.
-
") Views: 308
Views: 308
Child labour in Austria. ;) -
 Views: 270
EPS block for re-enforcing the fuselage, with balsa sticked on it to act as a tunnel for the push rods -
 Views: 279
The re-enforcement / push rod holder finished. If you look closely, you'll see the openings where the push rods will go. Also laminated, to make it more resistant. -
 Views: 262
Motor mount -
 Views: 266
Motor mount - another view. Glued with CA, then with hot glue. Attached to EPS with UHU Por and additionally secured with carbon rods. -
 Views: 272
The pushrod holding block you saw above, also acting as a holder for the RX. Servos located between this block and the monoblock. -
 Views: 266
ESC in the lower compartement, for better cooling. The lipo in the final configuration sticks all the way in, to achieve the correct CG. -
 and only attached by packing tape. I guess having that part removeable will help eventual repairs in this area.") Views: 259
Views: 259
A view into the fuse. The top cover is placed on two sideways depron strips (you can see them above the wing holder) and only attached by packing tape. I guess having that part removeable will help eventual repairs in this area.


