Xpress..'s blog View Details
Posted by Xpress.. | Apr 09, 2020 @ 04:32 PM | 19,758 Views
Hello everyone, I have decided to move my 51" Slick build log to my personal blog to keep better track of it. I have also decided to finish my build as a pictoral guide rather than a video log. Here are the first set of build videos:

AJ Aircraft 51" Slick 540 box contents (7 min 22 sec)


AJ Aircraft 51" Slick Landing Gear Installation (15 min 38 sec)
...Continue Reading
Posted by Xpress.. | May 22, 2019 @ 12:40 PM | 20,474 Views
Hello everyone,

Unfortunately my time with Hitec RCD USA has come to a close. If you have questions regarding the product, I can still try to answer as best I can, otherwise contact the Customer Service Center:

858.748.6948
service@hitecrcd.com
Posted by Xpress.. | Apr 10, 2018 @ 06:21 PM | 50,145 Views
Hi guys, building my 2nd AJ Aircraft airplane, a 115" Laser 230Z. I have a MONSTER ZDZ-180 that needs a new home and this airplane should do it nicely.


Last night was all about getting the airplane out of the box, taking inventory of the hardware, and finally getting it onto its main gear so I could store it while I'm not working on it. Please check the annotations on the photos, they state all that was done ...Continue Reading
Posted by Xpress.. | Oct 03, 2017 @ 03:46 PM | 48,333 Views


If you don't have a Multiplex FunCub XL then you really are missing out on an airframe that is just silly fun to fly- big emphasis on the word FUN! I have been having an absolute BLAST with mine and it's just about al all stock, out of the box, RR. Normally I'm a giant scale pilot but this Cub has really changed my pace up lately and brought my interest right to it. There are a few things that I have done to get better performance out of it that I'd like to discuss, it has really changed how the thing flies and feels in the air.


1. I added a Castle Creations 10 amp BEC set to 6.5 volts. This voltage will not hurt the HS-225BB servos the aircraft comes with, but it will give the airplane a more responsive and crisp feeling in the air since the servos now have additional speed and torque.

...Continue Reading
Posted by Xpress.. | Sep 19, 2017 @ 04:01 PM | 56,346 Views
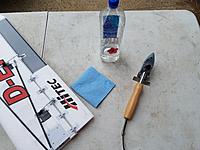
Ever get tired of all of the dents in your foamy either from normal use, hangar rash, your friend dropping your wing panel onto the ground and filling its smooth surface with a golf ball finish on your brand new airplane? Well tire no more!

This is a simple trick that was taught to me years ago and it seems to work really well on a variety of foams including insulation foams (Depron, Bluecore/FFF), EPO, Elapor, Z-Foam, I've even had some success using it with regular EPS. The process is simple:

1. Gather your materials.

You will need a,

-Covering iron
-Water
-Paper towel
-Your dented foam


2. Set your covering iron to full throttle- no don't set it conservative, put that thing on full blast! Let it heat fully


3. Soak your paper towel completely until it is dripping wet.

...Continue Reading
Posted by Xpress.. | Aug 03, 2017 @ 04:55 PM | 47,629 Views
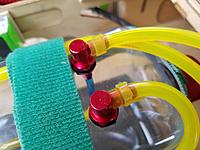
This trick was shown to me by Colton Clark and it's a foolproof method to secure your Tygon tubing to your fuel fittings. Real simple, all you do is slice a ~1/8" section of the same Tygon tubing, place the small slice into the end of a pair of needle nose pliers, spread the pliers open, then slip your fuel line into the small slice of tubing. Remove the pliers and you now have a secure way to clamp the tubing onto all of your fuel fittings.

Zip ties leave open room for air to leak in where the tie leg meets the head, and the small spring clips are annoying to deal with and could potentially chafe through the tubing. I've never had a fitting come loose and neither has anybody I've talked to that uses this method. It compresses the tubing evenly all round and without any sharp points of contact.
Posted by Xpress.. | Jul 10, 2017 @ 12:58 PM | 63,901 Views
I've had this airplane for about 2 years now and have grown very fond of it. I've made probably a dozen different changes to its internals to better its performance or improve upon other areas that were not assembled correctly. It has taught me how to really fly 3D with larger airplanes and as such, I refuse to let it die.

I've also managed to crash it probably half a dozen times

I've been fortunate enough to have crashed it in manners where it is rebuildable. This time, I had what I am certain is the engine overheating on me right at the worst possible moment- at the bottom of a waterfall. As I punched full throttle to climb back out the engine decided it had enough and dropped back on me. Truth be told I probably should not have been flying in 95F heat with 95% humidity, everybody was having power loss issues. If you're gonna play with fire you're bound to get burnt at some point.

This blog will document the repairs and changes I make to the airplane from this particular incident. This is what the airplane looked like the day I brought it home. It had roughly 15 flights on it so it was fairly new.


A club member happened to be filming the flight:

Remote control Airplane 107" Stunt Flying and Fail 7-8-2017 (4 min 21 sec)


I know the engine sounds a bit unhealthy but it has ran like this as long as I've owned it. It's really worn out compared to my new DA120.
Posted by Xpress.. | Jun 07, 2017 @ 05:56 PM | 51,249 Views
Hi all, a lot of our end users don't know that we have a direct source for purchasing airplanes and replacement parts for Multiplex products.
Some of the parts are unavailable through some of our distributors anymore so we have created a way for you to purchase the parts you need! We also
have a few airplanes that are exclusive to the Weekender Warehouse so be sure to check those out as well while you are there, you can pre-order them
now and when they arrive they will be shipped out to you ASAP! Click the banner below to enter the Weekender Warehouse website!


If you do not see a part listed then lease feel free to reach out to us and we can try our best to get that part located for you. Parts that do
not have the "ADD TO CART" button listed below them are temporarily unavailable, they will be listed again as soon as we receive them.

Contact
858.748.6948
orders@hitecrcd.com

[please note that this is not a contact for purchasing]

Posted by Xpress.. | Apr 19, 2017 @ 10:26 AM | 51,865 Views
I have been asked a few times lately about the proper way to install a servo into your aircraft utilizing the grommets and brass eyelets. A lot of people don't actually know and there isn't much documentation on the proper installation procedure so I am going to detail it here.

It's actually very simple, the grommets only install one way into the servo, it's the brass eyelet that you need to be concerned with. For most standard installations, the servo mounting rails will be installed above the mounting surface. The brass eyelets have a small flange on them, this flange is what needs to face into the mounting surface.

The reason you want the flange in the eyelet to face the mounting surface is so that it does not crush the mounting surface when you tighten the screw down. The wide flange spreads the load out, you always want the flange to face the mounting surface.

When you tighten the screw down, you don't want to crank the screw down. There is 2 reasons for this:

1. You don't want to crush the surface the brass eyelet presses into and possibly compromise the mounting surface.

2. You don't want to strip out the hole the screw threads into.

All you need is for the screw to pinch down on the rubber grommet, this will compress the grommet slightly and force it to squeeze both down onto the brass eyelet and squeeze out onto the servo mounting rails. This is plenty sufficient for both small aircraft all the way up to giant scale airplanes
Posted by Xpress.. | Feb 22, 2017 @ 03:00 PM | 53,271 Views
My main passion is RC airplanes, namely giant scale, but sometimes it's just not possible to go flying due to inclement weather conditions. Flying weekend after weekend can also burn you out so sometimes I like to take a break and change things up for a bit. Bi-monthly desert trips have helped out but one thing I always have enjoyed doing is RC cars. It started probably 15 years ago, not long after I started flying airplanes, with an XTM Xcellerator Nitro RTR from Hobby People. I drove the snot out of that car but eventually wound up selling it as I kept breaking turnbuckles. Upgraded to an XTM Xterminator RTR, not sure which version I had exactly but I know that it came with all of the upgraded parts on it and the 'big cooling head' on the XTM 24.7 engine. At some point I acquired an XTM Mammoth off of a flying buddy, he bought the truck to use for spare parts but the truck was all there in a box, I took it home and re-assembled it in a handful of hours. I still have that truck to this day and will have it running again in short order.

Fast forward to a handful of months ago last year, I got bit by the RC car bug again. I won a Traxxas T-Maxx 2.5R in a company giveaway which unfortunately had a locked up engine. I thought for sure the engine was a goner but my coworker suggested I take it all apart and soak it in nitro fuel overnight to see if that will free it up. That did the trick as the next day I was able to free up the stuck crank and she was spinning freely again....Continue Reading
Posted by Xpress.. | Feb 02, 2017 @ 04:06 PM | 56,952 Views
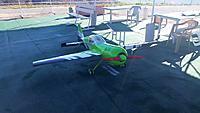
Out of all of the airplanes out there, 2 stand out as being my favorite. The first of which is the Slick, I have 3 of them in my hangar, all Aerobeez- a 48", a 70", and a 91" 70CC. The second of which, and certainly not any lesser, is the Edge 540. I've had a couple of Edge foamies through the years but never anything built up, let alone gas.

So here goes. Nothing over the top fancy, but it's not going to be an entirely stock build either. This is the particular scheme I have.


Now I've actually had this airplane since mid 2015 and decided I no longer want to wait to put it together, out came the credit card!!!

Last night I started with dripping some thin CA onto the outside of the phenolic tubes in both the wings and the elevators to make sure they are locked in place. I also dripped thin CA around the anti-rotation pins and servo pockets. Hitec HSB-9380TH servos were the servo of choice for this airplane for me so I dropped 2 into the left wing panel.

Of course it never dawned on me that I didn't have harnesses or aluminum horns for the servos until after I mounted the servos in place so that is where I stopped for the night.
Posted by Xpress.. | Nov 10, 2016 @ 04:03 PM | 55,598 Views
It's been a while since I made a blog entry, I figure I'll fill in what I have been up to. To keep a long story short, Aerobeez has generously offered to me a team sponsorship and has given me the opportunity to test out their new prototype 126" Extra 300.

Airplane specs:

-126" wingspan
-126" long
-40lbs dry weight
-ZDZ180B2RV-J CHAMPION engine
-Falcon 32x12
-Hitec HS-7980TH x6
-Hitec HS-M7990TH x2
-Hitec HS-5565MH x2

Another fellow team pilot Santiago had the airplane in his hands earlier this year and did a lot of testing with a DA-200 and a full 13 servos with the airplane flying at close to 50lb.

3D Night Flying at Joe Nall 2016 - Part 4 (6 min 20 sec)


It flew very well and tracked very true, the 200 having more than enough to haul the airplane around. Fast forward to August this year I wound up with the airplane in my hands and got to work getting it back in tip top shape. The airplane sat in a warehouse in LA during the middle of the summer heat so it was in desperate need of TLC which I was happy to oblige to. I thoroughly enjoy working on these airplanes as much as I enjoy flying them so it was no big deal.

Many hours with the covering iron later and she was looking fresh and renewed, ready for equipment to go in. I decided that I was going to take a more conservative approach with the servo count since it has provisions for 3 servos per aileron, 2 per elevator half, and 2 for the rudder, instead opting to go with 2...Continue Reading
Posted by Xpress.. | Feb 27, 2010 @ 09:32 PM | 194,997 Views
Well, after digging through some stuff today, I came across the beaten and slightly bashed Mountain Models Slipso fuselage I had placed inside a box for when I was moving. I remember working on the wing a year and a half or so ago, trying to give it a nice smooth airfoil, then coat it in epoxy and give it a nice finish

Welp, dug out the wing, and taped it to the fuselage ( ), and am going to work on it tomorrow or sometime, converting it to a nice micro sloper (or maybee back to a high speed plane..)
Posted by Xpress.. | Dec 05, 2009 @ 10:06 PM | 199,383 Views
Ok, made another battle bot today, using more HS55s. They still have the stupid wandering problem, so it's impossible to center them. But it works good

The flipper arm I have can easily flip a 75g box, which is good because the max weight is 75 grams for bots.

Here's some pics. I'll make another entry with a video.

Also, here's a video of a saw i'm working on to chomp through bots and flip them all around

Micro Battle Bot chomping saw (0 min 23 sec)

Posted by Xpress.. | Dec 05, 2009 @ 12:14 AM | 199,332 Views
Okay, so i made this little guy today for battle at an upcomming show.

They're pretty easy to make, and only require a few simple things a lot of people might have lying around.

Materials list:

Pieces of 3mm and 6mm dperon (or cardboard)
2, 7-9 gram high speed servos
Scraps of carbon fiber flats, or balsa wood (for strength)
Hot Glue
Micro receiver
2s 200-400 mah lipo
Small BEC
Small motor with Rx connector wired up (for a simple saw)
Elevon mixing

Now, you can build pretty much any shape robot you want- I myself am going for a small design under 75 grams, and smaller than a 4" square box (for the competition).

First step is to modify your servos, so that they will drive continuously, and not stop when you push the sticks to the full (they will stop moving once at center).

Follow this link for step by step instructions to modify your servos:

http://letsmakerobots.com/node/4873

Once you have done that, you can now either make some wheels out of foam or cardboard, and glue them to a servo arm, or cut some pushrods the same diameter as the hole in the servos output head, and use some wheels that have the same diameter hole as the axle, and glue them into place (carefully! you don't want to freeze the output head in place!).

Now, assemble everything onto the chassis, and then begin to build foam around everything. First, make the sides of the bot, so nothing gets in the way of the wheels. Now, make the front, and rear. Typically, you...Continue Reading
Posted by Xpress.. | Mar 09, 2009 @ 01:05 PM | 197,077 Views
Well recently being moved from my old workshop (as well as my big flying space ), I had to setup a new one. Luckily, the new house I've moved to had a basement room that I'm using as a current workshop. There's just enough space to store all of my gear in there, and have a good space to work on.

I've only built (well, rebuilt) one plane on it sofar, and it's working good sofar. Gotta add more pegboard on the workshop wall, and all the holders for all of my tools. Also, probably going to build a charging station, when I get a few more chargers.