benzo99's blog View Details
Posted by benzo99 | Oct 10, 2019 @ 05:31 AM | 62,599 Views
Introduction

The purpose of this guide is to explain how to update the firmware on the internal Multiprotocol Module in the Jumper T16.


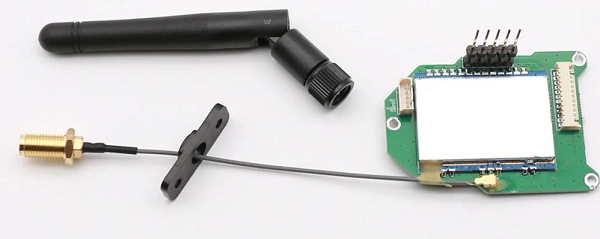
Jumper T16 Internal Multiprotocol Module

Starting in OpenTX 2.3.3 it is possible to flash the T16's internal Multiprotocol Module from the radio's SD card, but doing that requires the module to have the bootloader installed. Early versions of the T16 Pro with internal module, and the standalone internal modules sold as upgrades do not have the bootloader installed.

What's a 'Bootloader'?
The 'bootloader' is a part of the firmware which is independent to the main application. It resides in the first section of flash memory and facilitates (among other things) flashing the main module firmware from the radio.

The Multiprotocol Module's bootloader is independent from the radio's bootloader (the one you access by powering on with the trims held inwards) and you cannot access the module's bootloader directly.

Does my T16's internal module have the bootloader?
Recent T16 radios have shipped with Multiprotocol Module firmware v1.2.1.85 - these radios do have the bootloader installed, and (unless you have a problem) you can skip the process described in this guide.

Older modules, which shipped with Multiprotocol Module firmware v1.2.1.51 do not have the bootloader installed and you need to follow this guide to update the firmware on your module, and at the same time install the bootloader (enabling future updates from the radio).

You can...Continue Reading
Posted by benzo99 | Nov 20, 2016 @ 03:19 PM | 28,145 Views
This article is still a rough draft because I'm still working on adding all the details. Please come back when it's finished!!

I decided to upgrade the stock Tx and Rx for my Cheerson CX-20. I used a Turnigy 9XR Pro transmitter with the DIY multi-protocol module and an FrSky X8R receiver, but this post could apply to other Tx and Rx hardware as well.

Step 1 - Replace the receiver
Replacing the stock 8-channel receiver is pretty straight-forward. I used the X8R because it supported telemetry via S-Port (see my other blog post for details about getting that to work), works with the multi-protocol module, and seems to have a good reputation. I could also set the receiver up to support 16 channels meaning I had more options.

You could simply wire in the new receiver as a direct replacement by moving the stock wiring to the new receiver, but I decided to configure the X8R for D16 'Mode 4' which meant I had channels 1-8 on the SBUS port, and channels 9-16 on the PWM pins.

Because the CX-20 stock FC does not support SBUS an additional converter is needed to convert the Rx's SBUS output to PPM for the FC.

Part's needed:
  1. FrSky X8R Receiver
  2. FrSky SBUS to CPPM converter

Installation steps:
  1. Remove the existing connections from the receiver to the flight controller
  2. Connect the power connector from the PDB (was connected to 'B' on the stock Rx) to channel 8 on the X8R
  3. Connect the CX-20's underbelly S1 connection to channel 1 and S2 to channel 2 on the X8R
  4. Place a
...Continue Reading
Posted by benzo99 | Nov 19, 2016 @ 04:38 AM | 25,808 Views
I decided I wanted to add telemetry capability to my CX-20. I don't have FPV (yet) and didn't particularly want to add external 433MHz transceivers for telemetry, so wanted to do it on the transmitter, as can be done with the Taranis and other transmitters.

I'm lucky enough to know hpnuts (Pascal) through work, and on his advice I started to look at the Turnigy 9XR Pro transmitter, along with the 4-in-1 multi-protocol transmitter module.

With some help I got this to work fairly easily.

Step 1 - Add a power module (optional)
A power module allows the APM flight controller to get information about battery voltage and current. APM power modules for the CX-20 can be found cheaply on eBay. I did this part first because it can be done independently of everything else - you can just use the data for failsafe setup.

The module required a minor modification to be compatible with the CX-20's flight controller - you have to replace the six pin micro-JST plug with a 3-pin plug. This process is well documented in Spy's Useful Info post. I used these 3-pin connectors.

Once the module is installed it needs to be calibrated.

Step 2 - The transmitter
Obviously the stock transmitter won't do. I needed an upgrade. As I mentioned above, the Turnigy 9XR Pro fit my budget and seems to do everything I want. I got mine from Hobby King for £49, but I've seen it as low as £39. You need to add a battery and a module.

Upon receiving the transmitter I flashed it to the latest available ...Continue Reading