JussiH's blog View Details
Posted by JussiH | Jan 17, 2013 @ 11:47 AM | 78,402 Views
Autoquad Hexacopter with Alexmos simple brushless gimbal controller.

Gimbal designed by SebastianJ.

Autoquad Alexmos gimbal test (2 min 36 sec)


Coming soon toViacopter and Flyduino.

Specs in video description.

www.viacopter.eu
Posted by JussiH | Dec 25, 2012 @ 12:24 PM | 80,598 Views
Fabio Varesano passed away from a sudden heart-attack a few days ago. My heart is broken over the loss of this great man, friend, innovator and open-source champion.

Please show your last respects and help to honor his memory by posting in this thread.

Fabio was a great man and I was proud to call him my friend. I had the privilege of being able to visit him in Torino in the summer of 2012, and I got to know him as every bit as good a man as he has shown on the forums – always willing to help out and explain something again. His passion and dedication for open source motion sensing was only surpassed by his love for Arianna and his family – my deep sympathy and all my thoughts go to them.

Fabio – you will be missed!


Posted by JussiH | Apr 08, 2011 @ 03:30 PM | 82,029 Views
I am pleased to announce that my small shop for multirotor related stuff is now open:

www.viacopter.eu

Thanks to Signguy for the logo design, and to Niall for helping with the shop framework!
Posted by JussiH | Apr 06, 2011 @ 08:20 AM | 88,541 Views
It was time to get serious.... so I have retired 420RcPilot, and instead I now sound my real name: JussiH

I am still the same guy...only the name is changed!

Jussi
Posted by JussiH | Jan 10, 2011 @ 06:29 AM | 115,045 Views
Edit: 9/4-2011

Some very nice users has pointed my attention towards the fact that I have overlooked to connect the top and bottom PWW Rows (Pins 0-13 + gnd and aref)

This means that you have to use the lower set of PWM pads for pins 2-13 pins to get signal to motors. Otherwise you can jumper the appropriate pads between the upper and lower PWM row on the shield.

Andother remark is that there is a track missing between the stable LED and R2. This is easily solved with a small jumper!

I will upload pictures of the fix soon!

As a consenquence of this I am lowering the price to 6E for these, and I will be making a revised version soon!

Sorry folks!

Edit:7/3-2011

First batch of shields are in! They have passed initial electronic test and everything checks out

Ordering through my shop only: www.viacopter.eu

Assembly guide:

https://www.rcgroups.com/forums/show...5&postcount=89

Pinout:

https://www.rcgroups.com/forums/show...3&postcount=62

Cheap 6DOF using WMP and BMA020 breakout:

https://www.rcgroups.com/forums/show...7&postcount=90
Posted by JussiH | Jan 02, 2011 @ 07:21 AM | 91,225 Views
Here are the shcematics and board files for the KK V5.5 "Blackboard"

Designs are basically a modification of Kapteinkuks original V5 SMD board.

Changelist:
  • Onboard Gyros ENC-03-RC (small version Gyrostar)
  • Changed all caps, except C5 C6, C7 and C8 for ceramic 0.1 uF
  • Slot mounted Yaw gyro
  • Atmega168 instead of 48 (More memory so you can play with the XXcontroller soft by Mike Barton, or write your own)
  • Funky black soldermask!

Orginal, factorymade and tested boards can be bought from me, Niall and probably also some other suppliers very soon!

Introduction price will be a very low 79 euros plus shipping! This is a shorttime offer only and mainly because there was some small silkscreen errors in the first batch) - This price includes a royalty to Kapteinkuk!

Designs are here for those who wants to try and make their own board and as a reference. Private, non-commercial reproduction only!
Posted by JussiH | Dec 22, 2010 @ 10:15 AM | 445,097 Views
Edit: 24/8-2011

OK, lots of new stuff has happened since I started this. So here is a short recap:

I started out with the idea to make a all-in-one arduino board designed for RC flight and personal UAV´s. The idea grew from the Multiwiicopter, and a desire to replace hacked Motion plus/Nunchuks/arduino/wires and shields with a single board that could hold all the necessary components and be cheap to manufacture, and work for all the different arduino-based FC projects. And available as open hardware for anyone to make!

It very soon changed direction into evolving a digital IMU - FreeFlight IMU. The first version was the 1.1 and only 20 was made of those. It carried the ITG3200, BMA180, HMC5843 and BMP085 sensors.

During the prototype phase it was announced that Honeywell would replace HMC5843 with HMC5883L. And this spawned the first production version, the 1.22l, designed around the HMC5883L. A lot of effort was put into sourcing HMC5883L as it was unobtanium for a while, but with the help of the community the first prototypes rolled out from the factory in the beginning of April. The later batch of totally 100 units was sold out, almost immediately. I did have some issues with the magnetometer, but eventually all was solved and the FF IMU 1.22L has proven to be a good performer in Multiwii, Aeroquad and Ardupirates platforms.

About this time all hell broke loose. It seems people got inspired and all of the sudden everyone seemed to make IMU´s. We have...Continue Reading
Posted by JussiH | Dec 01, 2010 @ 07:14 PM | 185,022 Views
Guide for assembling the 1.11 shield is here - this also covers the 1.2 version as the changes were mostly cosmetic:

https://www.rcgroups.com/forums/show...&postcount=188

For Versions 1.0, 1.11 and 1.2 you need to supply 5V on to one of the motor, servo or RX pins. Otherwise the LDO wont be powered in a FDTI situation and you wont have power to the sensors if using 3.3V supply from shield. For WMP and NK you can power from D12 - in this case the power from FDTI will also power the sensors.

A few words of caution:

The ProMini is a bit fragile. Take care when soldering on it. Always heat pins instead of pads.

It is very tricky to remove a pin once you soldered it into the ProMini. The board is thin, and the small pads rip easily - especially when heated!

When soldering pin-rows it is good practice to solder a corner pin first and use that to line up the row before soldering all the pins.

Pay attention to the input capacitor (C1) it is a polarized tantalum cap, and needs to be mounted the right way around!


---------------------------------------------------------


There are 2 versions available:

Raw PCB alone is 6 Euros

PCB, 3.3V positive LDO regulator/filter caps and 4,7 Kohm I2C pullups and 4108 diode for D12 is 10 euros!

Included components:

1 * L4931CZ33-AP 3.3V LDO positive regulator (IC1)
1* 2.2 uF Tantalum cap (C1)
1 * 0.1 uF ceramic cap (C2)
2* 4.7Kohm resistor (R1 and R2)
1* 1N4108N Diode (D1)

You can now get these from my shop at: www.viacopter.eu

Note that version 1.11 and 1.2 are sold out - Version 1.3BT is on its way here and should be in early may!
Posted by JussiH | Oct 02, 2008 @ 02:38 PM | 92,805 Views
Hi people.

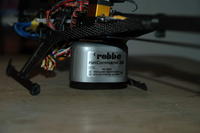
Just got through setting up a Robbe/Captron Helicommand 3a on my SJM400 to try and work it out - so a friend can get it on his heli to help him get more stick-time.

Thought I´d share my views on this nice little bit of kit.

It weighs 35,2 grams with the connection board, which is actually only about 7-8 grams more than a Futaba 401. It needs to sit so that its IR-sensor is looking downwards. This is why I mounted it to tailboom-bracket

Setup was a real pain. Without the PC-interface, it would have been impossible to set it up. Just following the steps for setting up via setup-button, was not enough as I had to reverse several servos in pc-link and reverse two axises, to get it to behave properly.

You have to pay special attention to setup of swash servos, as servos are connected with pitch and elevator servo swapped around.

The english manual is about the worst one I have ever seen for a product of this price. Seems like it was translated from german original using google translate.....

Good thing I have experience with setting up CP helis, otherwise I might not have figured it out. Took me several hours to get it working properly....

Since all mixing is done by the helicommand, The PC-interface is an absolute must to program things such as travel adjust, and swash mixing rates.

Once setup, you have to pay special attention to trimming swash to neutral, using the trim tab in pc-interface. When airborne the HC has an "autotrim" function, that...Continue Reading
Posted by JussiH | Sep 24, 2008 @ 10:50 AM | 90,374 Views
The newest addition to my collection: The all-new SJM180 (215)

I just got it finished last weekend, and been flying it in my garden the last few days.

And I like it very much - the kit is overall well made, requiring very few adjustments to be all good.

I had to file a bit in the motor mount to move motor back for perfect meshing of gears.

Also had to sand a small shim inside main shaft stand to get bearings flush with stand housing.

I turned both tail drive gear and motor pinion upside down to get proper meshing. Set screw for tail drive was too long, so i filed about 1.5 mm off it, so that it would clear teeth on tail and main gear. All minor details, and came as no suprise, as this kit is first generation of the 180. Very easy fixes.

The mechanics are very vell made with no or very little slop. Only issue seems to be the supplied ball links - some of them do not grip properly and is very loose when mounted. I changed all links to SJM400 adjustable links - and slop is all gone. There is some horisontal slop in flybar, but it doesn´t affect flight as long as the links from flybar to mixer arms are slop free

The supplied FG 215 mm blades, are very heavy and poorly balance matched. I had to use 15 cm of insulation tape to balance them. One weighed 14,4 grams, the other weighed 14,8.

Also the silver metallic gelcoat is not only plain ugly , but is also has blemishes and minor cracks along the edges, but nothing serious.

With proper balancing, they will do the job,...Continue Reading
Posted by JussiH | Sep 23, 2008 @ 04:22 PM | 88,592 Views
One of my favorite helis - SJM400 CF Pro.

I bought this one dirt cheap from a noob, who had given up on it.

The rods from flybar cage was missing, so i used two Compy 3mm feathering shafts to fashion my own flybar cage.

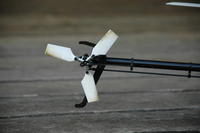
I also added the tri-blade tail - got it from Rc-tek.com. Othervise it is all stock.

I really like the tri-tail, with its 3 blades and wider pitch range, it really gives good tail authority and outrageous piro-power - especially at lower headspeeds.

The 400 has good power on stock motor, and all parts are precision made, for a totally slop-free head and tail.

I´ve had it for about a 8 months now, and it has seen some serious crashes in that time, but always is less damaged than you think after crash. This bird is very solid, so far I have only managed to break a battery board on frame, and that was in a nose first straight down crash from 30 ft.

Parts are very reasonable priced, so it not too expensive to maintain. Crash parts are mostly main gear, blades, shaft and feathering screws.

Only drawback IMO is the Mod 04 main gear, and the fact that tail belt is driven off the main gear via a tail drive gear. It has no impact on flight char., but it is pretty noisy.

Setup:

JR921 RX
SJM Pro outrunner 3800 KV with 14t
Hobbywing Pentium 30A BESC with governor
4*HD-2216HB High torque digital servo (13.5g, 2.2 kg, 0.09 s)
Logictech LTG-2100 HH Gyro
Aplus 1800 3S 25C = 6-7 minutes flying time ST2
AUW: 644 g

Headspeed is in the 3000 RPM range @ 100-92,5-100 ST2

Would recommend this kit to anyone looking for a precision made chopper at a very reasonable price....

Regards

Jussi
Posted by JussiH | Sep 09, 2008 @ 03:10 PM | 89,153 Views
My child of grief: EP100 Pro

I´ve had soo many issues with this one, and it pretty much sits on the shelf now. Simply too many issues and not enough power.

I Bought mine about the time it was discontinued and replaced with the GAUI200.

The biggest drawback on the frame is in my opinion the weak tail mount. As it has been discontinued, I have had no luck finding the CNC tail mount.

To put some rigidity back into frame I made an aluminium bracket to stiffen boom mount, and hold back frame together. This has made tail more rigid, and not so prone to vibration.

I have the metal head, and the Precision tail sold at Flying-Hobby.com. On the precision tail I replaced the supplied M1.3 blade mount screws with M1.5 Cap screws long enough to accomodate 2 nuts acting as chinese weights. The bell itself is well made, but the combined tail-fin mount and locking collar, is made from very thin aluminium, and will break in a tail-first crash - I know!.

I have also tried the V4 tail system from Flying-Hobby, but I didn´t like it, and it is almost impossible to get simple parts like bearings for the tail-bell. The slider and lever wears down very quick.

The new precision tail is actually some of the best parts I´ve yet seen for EP100/200. But otherwise I am not impressed with quality and machining of the CNC parts. There is a lot of slop in these heads, even when new.

I never liked the original EP100 canopy, and I think that the GAUI200 one is too heavy and bulky for...Continue Reading
Posted by JussiH | Sep 06, 2008 @ 04:51 PM | 89,004 Views
Thanks to Bas10an for basic design and idea for this heli. Not to mention all the parts he supplied - Thanks Dude! I like this one.....

The frame and main gear is from Skyartec Wasp V1. The motor screws hold the battery plate, which is the front half of the FG battery board from Compy300 V1. Landing skids are from a Walkera 52.

I broke the tail mount on the original frame in the first severe crash, so I cut down the 5mm boom mount from a CompyFP fiberframe and mounted it with M2 cap screws through frame. A bit of CF from a battery board sits underneath to stiffen back part of frame.

Canopy is from Esky Lama V4

Anti-rotation bracket and canopy support are my own creations.

Tail-mount is Walkera 4#1 with the back cut off. I drilled a 2 mm hole at an angle, and fit a 2mm carbon rod through hole. Simple and very tough.

The head and blades is stock Esky FP2 - blade size is cut to 170 mm for a total rotor diameter of 360mm. Flybar weights removed. Tailboom: 200 mm
Titanium flybar at stock length thanks to my very kind sponsor....

Setup:

Imax G192 HH gyro
AR6100RX
4800KV outrunner, 10A, from Firefox EP100
Hobbywing Pentium 12A BL ESC
GWS EDP-50 with 3030 prop on tail.
GWS ICS100N ESC for tail motor
2*Towerpro SG50 on cyclic
2S 900 Mah lipo = about 8-9 minutes flying time.
AUW: 233 G

I flies great - a bit by brute force - but still very fun. Flew it earlier today in 7-8 M/s wind, and was still able to keep control of it. Very stable hover in less windy conditions. There is a bit a pendulum effect on it - probably due to high position of tail motor. But nothing that cant be handled. Tail is solid as a rock.

Am already contemplating night blades for this one....

I will do a video when I have a camera available...
Posted by JussiH | Sep 06, 2008 @ 10:54 AM | 89,324 Views
This is my Honey Bee FP2 Moth.

Frame and hardware are Esky stock. Landing gear have been cut down about 20 mm in the back and 17 mm in front, for a nice forward-tilted attitude.

Boom is 240 mm, blades are 200 - all cut from stock Esky-parts. Tailfin is from CompyFP.

Setup:

10T pinion on 4500 KV outrunner, 10a (dont know the brand, got it from a friend - similar to Skyartec)
Hobbywing 10A BL ESC
GWS EDF-50 Motor with 3020 prop on tail /GWS ICS-100 ESC (Nimh version - important Lipo version will not work because of failsafe)
AR6100 RX
Esky HH gyro
2*Towerpro SG90 on cyclic.
2S 800MAh 20C/2S 900 MAh 15C = 9-10 Minutes flying time.
AUW: 262 Grams (with night blades and LED lights)

Sorry for the missing tailmotor - it burned out on me last week. In fact the EDF Motor is not well suited for this kind of heli, they tend to burn out fast.
Mounting a 5 or 7,5 amp fuse between ESC and tail motor is an absolute must, but even with fuse I managed to burn the ESC when motor died!

Have tried EDP-50 tailmotor with 4025 prop, and this yields enough power to hold tail at full throttle. The EDF motor is insane, and can piro the heli clockwise at full throttle - but it does not last as long as DD version, and draws much mure power - up to 4,9A at 100%. It is also much more noisy than EDP motor with 4025 prop.

I pretty much love this heli, and even though I also fly CP´s, this one is so much fun, in a limited space. Also pretty solid due to low AUW and dirt cheap to repair.

Here is a video me and a friend flying in the garden:

FP uprock part II (3 min 49 sec)


/J
Posted by JussiH | Sep 06, 2008 @ 10:01 AM | 89,043 Views
As I assume that there are no aliens in the RCG-universe. Greetings earthlings, and welcome to my rc-blog.

About me:

Earthling of the human race, of danish nationality, residing in North Sealand and Copenhagen. 35 earth years of age.

Been doing RC for a while now - my first cars where bought about five years ago. But they have been gathering dust, since I found a new love: Helis and Planes. This will be the main focus of this blog.

Flying inventory so far (In order of aquirement):

Lama V3 (it flew avay and got lost one late winter night)
Honey Bee FP2
Walkera 5#6
Compy300
Wildfly 3D
EP-100 Pro
SJM400 Pro CF
FP100 Micromoth FP
And a SJM180 on its way..

I fly all these at present with a JR X9303 (DX9), and both AR6100, AR6200 and JR921 RX´s. (Except the 5#6 and the lost Lama, which uses a Walkera 0703 PPM TX)

I will try to keep the blog up to date from now on, and in coming weeks I´ll post some threads on my different helis and RC stuff in order of adoration...

Best regards


Jussi