VicT's blog View Details
Archive for April, 2018
Posted by VicT | Apr 30, 2018 @ 05:52 PM | 5,203 Views
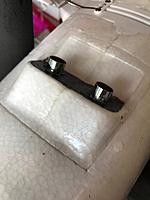
My packs are warmer than I’d like so I added some exhaust stacks for better cooling. I cut the foam stacks away then took an old chrome antenna tube, notched the end and hand drilled out the holes. After cutting the antenna into two 1 inch pieces I damped (water mist) the foam and used white Gorrilla Glue on the chrome.

While in the area I cut out the belly for access to the ESC and battery compartment. I took the motor and wires out to prevent damage and used a large box cutter. Beveled cuts keep the foam from pushing through. Tape or CA will secure the belly “pan”. Now I can angle a larger 3 or 4 S pack. Replaced the stock velcro with my favorite strap and added some compression foam to the wood floor. I have a ISDT cell checker and alarm velcroed inside to the dashboard. That way I can view the capacity remaining (20%) while on the ground. On low flybys I can see the red LED’s flash also. With the belly pan removed I was able to route the balance plug from the dash to the forward battery bay.
Posted by VicT | Apr 28, 2018 @ 07:04 AM | 5,398 Views
I got this idea from Martin on the Maule forum. It frees up the 2 position H toggle switch which is easier to reach and can operate gear, motor reverse, bomb drop, tow release, etc. The knob is harder to accidentally put into the motor on position and the big label sticks out right in front. Use the Custom Voice Setup, Custom Voice Events, and for the right knob (RKnb) in the Gereral sound category scroll and set
0 Throttle Cut
1 Silence
2 Motor On

I used a small bottle of enamel paint from Testors to paint the red and white side of the rotary knob. This stands out and means more than the red heat shrink that I have on the 2 postion H toggle switch.
Posted by VicT | Apr 18, 2018 @ 10:07 PM | 5,192 Views
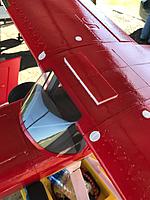
This is a lightweight version of my first skylight. It does not have the balsa frame with pins holding the clear plastic and does not have the plywood fuselage opening lining. So it is lighter and quicker to make. I use a Starbucks protein box for the plastic. Cut out the biggest rectangle within the top cover boundaries. The front plastic hinge has no overlap with the fuselage roof but the sides and aft clear plastic has a 1/8-1/4 inch overlap. Rather than using a frame to maintain the top airfoil shape the aft window is screwed down so the window is flush with an airfoil curve.
Posted by VicT | Apr 17, 2018 @ 10:52 PM | 4,597 Views
I will be using the struts because on the rigorous test flights without them I have found compression wrinkles on the top wing just beyond where the spar ends and the flap area begins. This is a stress riser due to the servo cutout area. The wrinkle is invisible until the wing tip is picked up. If a longer spar were used out to within 8 inches or so of the wingtip then there would no buckling. Horizon has no Maule spars for spares. So a substitute will be researched. Until then the struts will be used.

Plywood wing spar mod:

I cut out plywood wing spars with dimensions of 1/16” thick by 24 mm deep by 470 mm long. Each spar weighs 12 gms compared to each V strut that weighs 19 gms (w/o screws). The wing maximum depth is 30 mm so there is 6 mm between the spar and top of the wing.
Posted by VicT | Apr 13, 2018 @ 01:13 AM | 5,344 Views
The struts do offer extra strength but the spar tube ends where it contacts the the flap servo. This is where the stress riser is located and if loaded to failure this is where it will crack and cause wing folding. A full power vertical dive with SAFE/Self Level Off and a positive G pullout would cause a max load on the wing and possible cause a stress crack in the stress riser area.

I removed one strut and compared wing flex by resting one wingtip on the grass and “bouncing” the other wing tip up and down. I saw no difference in the two wing panels. There was no stress cracking or stretch marks. I the did inflight tests with full power 3S pack loops and max up elevator. I could not see any difference in wing flex between the panel with the strut and the panel with out the strut. I performed consecutive aileron rolls without seeing wing flex. I did not do spins, outside loops, or snap manuevers. I landed and inspected the wings for stretch marks and found none so removed the remaining strut for continued testing. I purposely made a hard landing and did not see any over stressing.

I’m not advocating the removal of struts but it can be done if you are carefull and limit manuevers to non violent ones.
If a strut fails inflight the stock spar and wing appear strong enough for a normal descent and landing without fear of wing failure or folding. Of course owners and operators take full responsibility for their aircraft and safe operation.
Posted by VicT | Apr 13, 2018 @ 12:33 AM | 5,148 Views
The strap that comes with the Maule can be cumbersome to use when securing the battery. The velcro can be used to keep the pack from sliding and the strap keeps the pack from lifting away from the battery floor. There is an easier way and here is how:

Use EPP type scrap foam on the aft end (or forward end of pack) to keep the pack from sliding forward or backward. Use a piece of scrap foam on top so that the battery hatch just comes into contact when hatch is closed and latched. Tape the foam pieces in place with clear packing tape. With different size packs you will use different size end and top foam pieces.

Pics show an Admiral 2200 3S pack. The stock battery strap is folded on the floor and the pack sits on top of the straps.
Posted by VicT | Apr 10, 2018 @ 09:38 AM | 5,674 Views
I’ve been installing an EMax servo for the other elevator half on Models I value. The cost is under $10 and I don’t worry about the stock servo failing and causing a crash. Here are the servo specs:

https://alofthobbies.com/emax-es08md...-13-grams.html

If using the 636 RX and reversing is needed I position the servo or use an inline reverser.

The Maule was easy. Measure the length of the rudder servo forward and cut a small hole. You will find that it is hollow and no servo wires are close to being cut. The elevator horn was from spare parts and a Dubro 2-56 rod and black Quick Link clevis was used. After the new servo is glued secure and the new elevator pushrod and clevis are adjusted to length....... THEN cut the plastic joiner. I used an Exacto saw but a metal hack saw blade will do fine. Adjust the clevis so the left elevator is the same angle as right elevator. Move the Z bend at the elevator horn or the clevis at the servo arm in different holes to get equal angles with full up elevator. A 12” long Y cable was taped to a piece of music wire and pushed from the new hole to the receiver and plugged into the elevator port. The stock elevator servo gets plugged into the other Y end. The same signal and power goes to both servos so any fine tuning is done using different holes in the servo arm and elevator horn. A little dab of White Gorilla Glue on the 4 sides secures the servo.