|
|
|||||||||||||||||||||||||||||||||||||||||||||||||||||||||||||||||||||||||||||||||||||||||||||||||||||||||||||||||||||||||||||||||||||||||
|
Thread OP
|
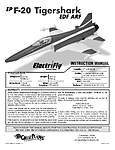
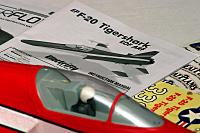
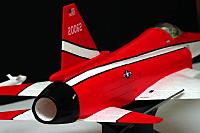
Great Planes� ElectriFly� F-20 Tigershark EDF Jet ARF ReviewIntroduction
Has it already been two years?! It was June of 2008 when my review of the Great Planes ElectriFly L-39 EDF went live here on Ezonemag.com. The little L-39 was the first semi-scale EDF air frame introduced by ElectriFly. It was manufactured using their unique AeroCell foam and included a HyperFlow fan unit and Ammo brushless inrunner motor in the box. I thoroughly enjoyed flying that L-39 and went on to purchase several more, which I modified to accept even hotter power systems. The L-39 airframes handled everything I could throw at them, and I logged many thrilling flights using them.
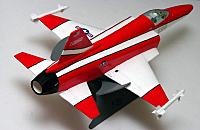
I was especially eager to see what ElectriFly would serve up next as a follow-up to their L-39. The recipe followed on the L-39 was almost perfect, and the stage was set for more airframes like it to follow. I first spotted this bright red F-20 Tigershark in a thread here on RCGroups.com. ElectriFly has finally released another EDF air frame which also uses their resilient AeroCell foam. The same 56mm HyperFlow fan used in the L-39 is included in the box with the F-20 but the included Ammo brushless inrunner is a hotter wind that uses a 4S lipoly battery and makes nearly 500 watts! As I opened the box and prepared to undertake the build of the F-20, the initial indications were that it would be well worth the wait!
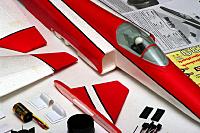
Kit Contents
Assembly
Before beginning any build, I normally will spend a little time reading over the assembly manual. I like to acquaint myself with all of the steps and get some idea as to the overall complexity of the process to come. I was a little surprised to read on the cover of the assembly instructions that only two micro servos were required for the F-20, but it turns out that was a wee typo, a relative rarity on ElectriFly's part. The correct number of servos required is noted in the Technical Bulletin, included below. The assembly manual is short and sweet but leaves almost nothing to chance. I followed it step by step and encountered no problems. I did wonder why the vertical stabilizer was not installed until nearly the very end of the build but leaving it off until the end allows the F-20 to lie on your building table upside down and conveniently flat, right up until the end.
The usual assortment of tools and adhesives is required to build the F-20 Tigershark. It is worth noting that AeroCell, ElectriFly's own unique and resilient blend of foam, does not require foam safe CyanoAcrylate adhesive. It is acceptable and safe to use regular CA in assembling the F-20. Foam safe CA IS, however, required when assembling the included display stand. Another caution worth noting is that though the instructions recommend using denatured alcohol to clean and prepare surfaces for gluing, a little is much better than a lot. Too much alcohol, or wiping the painted AeroCell too vigorously with it, can begin to attack the paint. And the finish is much too colorful to allow that to happen!
Wing
When installing the carbon spar into the channel on the bottom of the fuselage in preparation for attaching the two wing halves, it is key to get the spar settled all the way into the bottom of the channel. Failure to do so could result in one or both wing halves not attaching to the fuselage squarely. CA is the recommended adhesive for both inserting the spar and attaching the wing halves to the fuselage. Resist the urge to reach for the accelerator; it is probably best to let the CA cure without it. This allows time to double check that the spar is fully seated in each wing half, as well as properly mated to the fuselage, before the glue sets up.
The included foam filler piece covers the spar nicely but it is designed to accommodate the profile of the wing-to-fuselage transitions. Thus, it will only fit correctly one way.
Fuselage and Tail
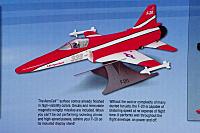
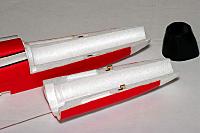
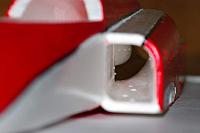
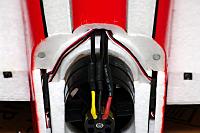
Other than the installation of the power system (covered below in Power System Installation) and the installation of the elevator servo (also covered below in Radio Installation), there is very little that must be done to the fuselage to get it ready for flight. Before beginning the assembly of the fuselage, I took a little time to study the unique full inlet and outlet ducting that ElectriFly includes with this F-20 model. It is fairly unique for a model of this size and price point to include this feature.
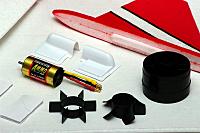
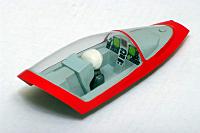
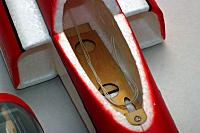
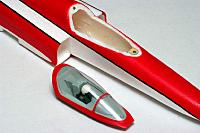
The forward section of the fuselage contains a piece of light ply that serves as the battery tray. The kit includes ample hook and loop material for securing the battery to this piece of ply. The battery compartment is easily accessed via a removable canopy/cockpit. This canopy is secured with a pair of magnets and includes a pilot figure and instrument panel decal.
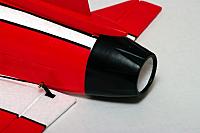
The final part of the F-20 assembly involves gluing the tabbed vertical stabilizer into the slot on top of the rear fuselage. This should not be done until the power system is assembled and installed. The fan assembly is accessed via another hatch which is secured with a pair of ply hooks and magnets. The design is both functional and secure. Once the hatch is in place, the plastic tail cone can be attached. I used a couple of small dots of CA glue. Tape is also mentioned as an alternative but I opted for the CA. I feared that trying to remove tape from the painted AeroCell foam to gain any future needed access to the fan assembly would probably result in the paint being pulled up.
Radio Installation
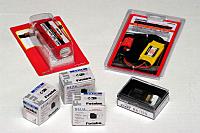
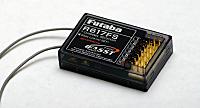
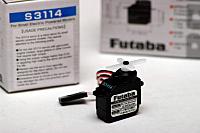
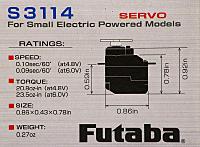
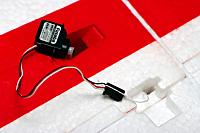
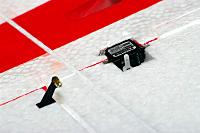
ElectriFly included the recommended Futaba radio components for this F-20 Tigershark review. These items include the Futaba R617FS receiver and Futaba S3114 Micro High Torque servos. Though the Futaba R617FS seven channel receiver may be overkill channel-wise, it is a full range receiver. An electric ducted fan model that achieves reported speeds of 85 MPH can get small fast and should probably not be flown on anything less than a full range receiver.
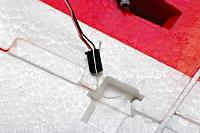
The bulk of the radio installation involves getting the three servos installed and their wiring routed back into the front part of the fuselage where the receiver will get mounted. ElectriFly has included factory installed pull strings to ease this endeavor. The factory recommends using thick CA to glue the three servos into their respective cutouts. I have long been a fan of hot glue for mounting servos in foam composition air frames and decided to employ my usual method on the F-20 as well. Either adhesive should properly secure the servos to the AeroCell foam. Before the servos can be glued into place, their leads must be pulled into place. The elevator servo lead is easily pushed through the hole in the side of the fuselage and into the fan compartment and then pulled forward using one of the pull strings. The aileron servo leads are pulled to their final destination via a two part process. The first part involves using the pull strings that are taped into place near each aileron servo cutout. These two strings are routed rearward into the fan compartment, where they then loop and head forward to the front battery/receiver compartment.
The aileron servo leads are pulled into the fan compartment first, at which point they need to be freed from the pull string so that the included Y cable can be used to join them together. This first part of the pull is a little tough due to the 90 degree turn that the connector has to make upon entering the fuselage. I used a smallish Phillips screwdriver shank to "round" this corner off a little. This allows the servo connector to make the necessary 90 degree turn with ease. The second part of the aileron servo lead routing involves using one of the pull strings to pull the aileron Y cable forward into the battery/receiver compartment.
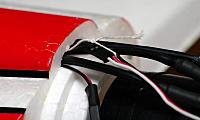
The aileron servo leads and Y cable connection should be secured using the included heat shrink, as should the elevator servo lead where it connects to it's included extension. Using a heat gun around a foam air frame can result in instant catastrophe if extreme care is not taken to protect the foam while using the heat gun (see the last photo below in the Power System installation for the method I employ). Once these servo connections have all been routed forward, they can be carefully tucked away in the provided channels and detents. I used a little hot glue to coax them into staying put. A little patience is in order when pulling the servo leads forward, as the motor leads will have already been installed and the "tunnel" that connects the two parts of the fuselage gets a little crowded when all of the required wiring has been installed.
The included aileron and elevator push rods install easily after the holes in the servo control horns are opened up to the proper diameter. If you do not have the recommended drill bit, it is important not to over drill these holes or excessive backlash will be introduced into the control linkages. The included aileron servo covers do a nice job of covering the aileron servos and push rods, as well as providing skids for belly landing the F-20. They attach securely using the pre-applied double sided tape.
ElectriFly includes a hollow antenna tube for those builders who may still be using 72MHz receivers, with their longer antenna wires. This tube provides a path to route a longer antenna all the way to the rear of and out of the fuselage. Since I am using a 2.4GHz receiver, I simply removed this tube.
Power System Installation
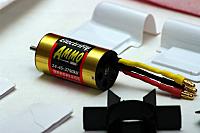
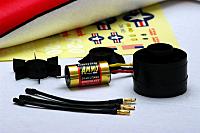
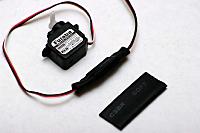
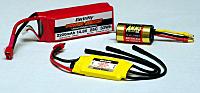
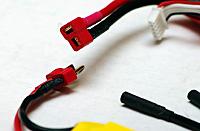
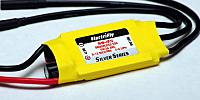
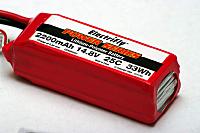
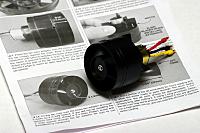
The F-20 Tigershark kit comes complete with a HyperFlow 56mm fan and an Ammo 24-45-3790 brushless inrunner motor in the box. The builder will need to supply an electronic speed controller capable of handling a four cell lithium polymer battery. The HyperFlow fan, with the included Ammo inrunner, will draw around 38 amps from the battery. The recommended speed controller is the ElectriFly Silver Series 45 amp ESC. I personally like how ElectriFly includes pre-attached Deans Ultra connectors on both their lipoly battery and speed controller. If you prefer alternate connectors, you will have to spend a few minutes with your soldering iron replacing them.
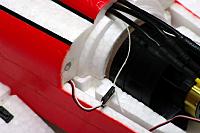
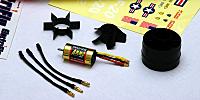
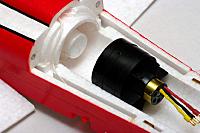
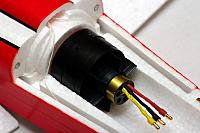
The first order of business in assembling and installing the power system is to mount the fan rotor to the motor. The included HyperFlow instruction manual capably shows how this is done. It is a good idea to carefully remove the flashing from the edges of the rotor blades, without altering their airfoiled shape. A few minutes cleaning up the fan rotor will help achieve a quieter running fan. Balancing the fan rotor is another way to achieve a smooth running and sounding power system, although doing so can take a little time and know how. Though the HyperFlow instructions show both a spinner and tail cone being used on the fan assembly, neither is included or required with the F-20 kit. The front of the rotor instead nestles up against the circular foam surface between the two inlet ducts. Though it may actually contact the foam on initial run ups, it will quickly seat into this foam surface and in the end create a nice, complete inlet ducting assembly.
The F-20 power system is good for almost 500 watts and spins at a very high RPM. It is imperative to use thread locking compound in the areas indicated in the HyperFlow instruction manual. The fan break-in procedure must also be followed closely. Easing the fan into its higher RPM ranges allows it to "seat" in the shroud properly. And one should NEVER hold a high RPM fan in their hands while running it in.
Once the HyperFlow fan has been assembled, it can be installed into the F-20 fuselage. There are indentations cut into the foam that will align to the ridges on the HyperFlow fan shroud. CA is the recommended adhesive for anchoring the fan in place. ElectriFly includes motor extension wires that connect the motor leads to the ESC leads and at the same time mate the different size bullet connectors together. The included heat shrink is used to insure that these leads do not come apart. These leads are attached to the ESC leads and fed rearward from the battery compartment. When using a heat gun to shrink the heat tubing, I use a damp dish rag to protect the foam from the heat blast. Just one stray stroke with a heat gun can have you calling for replacement parts quicker than you can say melted foam!
Completion
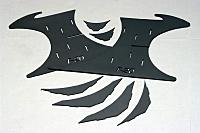
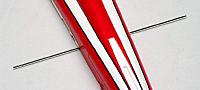
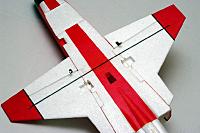
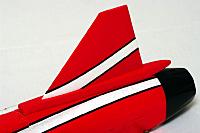
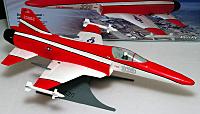
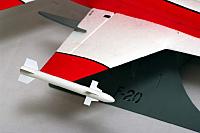
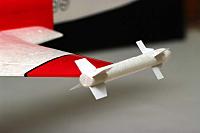
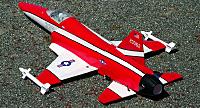
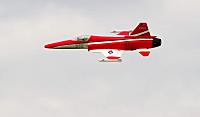
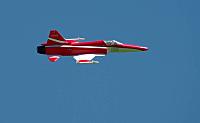
In just a few hours, I was surprised to find that I had completed the assembly of the F-20. This included the time it took me to stage all of the photos for this review. The average builder can probably complete the F-20 assembly in less than three or four hours. The included foam display cradle is a nice touch and serves as an excellent excuse to proudly display your F-20 in the house when it is not being flown! Taking a step back and looking at the completed Tigershark, I really like the bright red color scheme! It just looks fast, even sitting in the cradle! The included missiles attach to the wing tips by means of very small magnets. They are intended to be used for static display only however (wink, wink)!
The final steps of assembly involve radio programming and verifying the correct center of gravity. Recommended control throws are provided in the F-20 assembly manual. The recommended CG is 3 3/4 inches (95mm) from the leading edge of the wing at the wing root. There is a little wiggle room in this number and slight adjustments can be made to suit personal flying preferences. Using the recommended ElectriFly 4S lipoly battery, it was easy to hit the recommended CG. I used a Sharpie to mark the proper battery location on the wooden battery tray.
Flying
Basics
Prior to the first flight, it is always imperative to perform a proper radio range check. I also like to have one of my flying buddies do a final control surface throw verification, just to make sure that when I give it left stick that the left aileron does indeed go up and the right one down, and so on. Another good thing to do is to double check that the CG is in the proper range. All of these items are the small things that can often be overlooked during the final seconds before a maiden flight. But any one of them alone is enough to necessitate the walk of shame after an prematurely terminated 5 second maiden flight! Check, and check again!
Taking Off and Landing
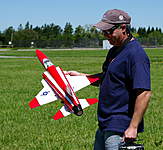
The only way to get the F-20 up in the air is to hand launch it. It does not come with landing gear, and in my opinion, landing gear on these smaller park sized EDFs is just wasted weight anyhow. But, it is not uncommon for many of us to feel a little trepidation at the thought of having to huck our model up into the air to get it flying. Will I toss it correctly? Will I have time to react if the launch is less than perfect? Under hand toss or over hand? Well, no need to worry for the F-20 is a great EDF model to help pilots and launchers build both confidence and technique in their hand launches.
The F-20 instructions mention two different ways of achieving a successful hand launch, under hand and over hand. But they also mention that it is best initially to use a helper, preferably someone who has some experience in hand launching radio control planes. I would personally recommend first watching the ElectriFly F-20 Tigershark factory video to observe a perfect hand launch taking place.
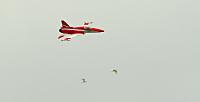
While flying the F-20, we tried both over hand and under hand launches. A low wing configuration air frame like the F-20 can make an over hand toss difficult. The most natural place to grip the airframe is behind the wing. But this location is behind the center of gravity. Thus, when advancing the throttle in preparation for the launch, the nose of the aircraft will pitch down towards the ground somewhat. This effect can certainly be corrected but there is also a modified overhand method that can get you around that tendency. I like to use two hands, with one holding the F-20 fuselage ahead of the wing and the other supporting it at the rear of the fuselage. I place a finger or two over the exhaust duct and then throw the aircraft straight forward, using the hand placed at the rear to push, or catapult, the F-20 forward as it leaves my hands. (See video below for examples of both under and over hand launches) With nearly 500 watts of power, the F-20 gets on step quickly no matter how you launch it! The most important thing to remember when hand launching is that you have to allow time for the jet to "get on step" before you try to give it any up elevator. You may at times, depending on your launch, have to give it a little down elevator to help make this happen.
Landing the F-20 is not very difficult at all. I like to fly belly landers like the F-20 at fields with lots of grass. If you plan to land it on anything less than soft, green grass, I would apply some clear 3 mil vinyl protective film to the bottom of the F-20 to protect it. The wing loading of the F-20 is light enough that it is very well behaved on final approach and during the flare. I like to enter the pattern on the down wind leg, with the power pulled back to around 25%. Wide, gradual turns are best. When coming down the glide slope on final, pull the power back to a bare idle and keep the nose down. Once over the landing area and within a foot or two of the grass, the power can be completely killed and the flare commenced. Done right, the F-20 will drop right onto it's flat bottom fuselage. If the grass is a little on the long side, it may flip over instead of sliding, as seen in my video below.
Aerobatics/Special Flight Performance
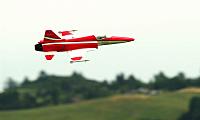
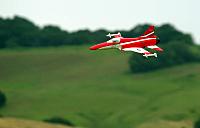
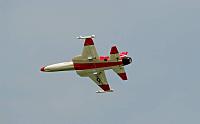
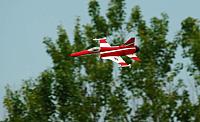
The F-20 is a little hot rod! It is hard to resist pinning the throttle stick to maximum for the entire flight, as the F-20 rockets across the sky with authority! But, if you are able to demonstrate even a shred of self control by pulling the throttle back off the stop, you will find that the F-20 is also quite capable of cruising around at half throttle. With its long, slender nose, the F-20 will try to drop it's nose when your bank angle gets extreme. A little up elevator will keep it tracking at altitude through these tighter turns. While the F-20 does lack a rudder, this does not entirely eliminate making knife edge style passes. The F-20 will happily stay on it's side for an amazing length of time if you enter a hot, diving pass and then roll into the knife edge. It is not of course a pure knife edge but fun nonetheless, as the F-20 color scheme pops when you show off the top of the air frame as you race by. Loops and rolls are all part of the F-20 repertoire of aerobatics. Inverted flight requires a little more down elevator than most to hold. This may be in part due to the short wings of the F-20.
Is This For a Beginner?
The short, stubby wings and long nose of the F-20 Tigershark introduce some curious orientation anomalies in my opinion and experience. With a top advertised speed of 85 MPH, the F-20 gets small quickly when flown at wide open throttle settings. At times, my brain tries to fool me into thinking the orientation is something that it is not. Though the color scheme is super bright, flying the F-20 on a gray day will reduce it all to a gray scale appearance. I would recommend that a beginner seek help flying an EDF of this size and performance. Intermediate and advanced level pilots should have no problems with the ElectriFly F-20.
Flight Video/Photo Gallery
Downloads
Conclusion
The ElectriFly F-20 Tigershark ARF EDF builds quickly and performs splendidly. Thanks to ElectriFly, we wannabe jet jockeys get a chance to fly an airframe of which only three full size ones were ever manufactured. The bright red and white color scheme pops brilliantly on a blue sky day and the performance envelope of the F-20 is very satisfying. Easily hand launched and easily recovered, this F-20 Tigershark will not bite intermediate to advanced pilots. I really like the way ElectriFly has created full inlet ducting for this model, with no need to supply auxiliary air to the fan via supplemental fuselage orifices. I do wish they would include a clear plastic nose cone overlay of sorts, as even the best of landings will cause the nose to suffer a little wrinkling and eventual loss of red paint.
ImagesView all Images in thread
|
||||||||||||||||||||||||||||||||||||||||||||||||||||||||||||||||||||||||||||||||||||||||||||||||||||||||||||||||||||||||||||||||||||||||
|
Last edited by Angela H; Jun 14, 2010 at 10:09 AM.
|
|||||||||||||||||||||||||||||||||||||||||||||||||||||||||||||||||||||||||||||||||||||||||||||||||||||||||||||||||||||||||||||||||||||||||


|
|
|
|
|
|
|
Great review, very nice video (as always), smooth flying !
Looks like it flies even better than my electrifly L-39 but with much better speed and power. Looking to go 4S on the L-39 ! |
|
|
|

|
|
|
|
|
I like it!
|
|
|
|
|
|
|
|
|
Jon,
Great coverage of this plane and super flying too. Nice job as in every review you have done. John |
|
|
Last edited by badpilotto; Jun 17, 2010 at 10:32 PM.
|
|
|
|
|
|
|
|
|
|
|
|
|
|
|
Nice review Jon. Should have mine ready in a few days.
|
|
|
Last edited by Ks.jetflyer; Jun 17, 2010 at 11:23 PM.
Reason: bad content
|
|
|
|
|
|
Nicely done.
I'm a big fan of the Airfield F5e which as you may know is the real world twin engine predicessor of the F20. I was unaware that only three F20 units were ever produced but I'm anxious to research that and find out why. All in all where EDF flight is concerned, this airframe is a tried and winner and it's nice to see that Great Planes has recognised this and produced another in the line. |
|
|
|

|
|
|
|
|
Great review as always! After doing this over 20 years, the choices available now are absolutely mind boggling. With the EDF's, it has been quite the white elephant to find decent ARF's. Manufacturers try to 'save money' by putting in inadequate electronics/fans/servos, they sell a few, word gets out quick, then either they only sell AF kits or none at all. If they ONLY PUT DECENT components in from the get-go, they would sell more with their own components and make more money in the long run.
Slowly, we are starting to see birds come with hardware we will actually USE, Phase 3 was one of the first, Jpower followed, and now we have the likes of the Habu from mainstream companies. And from GP, a small 4S bird-just add what you probably already have sitting around??? I am stoked a bit about this one! I was nowhere near so enamored with the L39, but that's another story. After owning ~80+ GP aircraft over the years, by the third 'flight' I tore it up in my hands and threw it away complete with electronics. But THIS one has my interest, I may have to pick one up, The price is about right compared to most questionable 3s import-of-the-month models that never work right, and well below the $400 threshold where things really start to get cool. I do hope someone will come out with something for a protective cone, that is one looong nose. My P3 EF16 has a couple hundred flights on it and she's looking the worse for wear(still on stock electronics). It may be time to get a new go-to trunk jet. |
|
|
|
|
|
||
|
|
Quote:
As it was aimed at the export market (the US Air Force had the F16). Unfortunately most dictators wanted the same pane that the "Big boys" have, the F16. Never mind that the F20 would have meet their needs better. It all comes down to image! |
|
|
|
||

|
|
|
|
|
Maiden flight on mine today-awesome flying and sounding jet! Installed tow hook 1 inch in front of c/g and used bungee launcher from Evader kit.
Perfect launch. Not much of a profile to follow in a banked turn so found it easier to turn around with split S or 1/2 cuban eight. Long shallow approach and start flair over threshold and settles in nicely, although a bit faster than used to. More practice will help. Definatly a good buy. |
|
|
|
| Thread Tools | |


| Similar Threads | |||||
| Category | Thread | Thread Starter | Forum | Replies | Last Post |
| Great Planes� ElectriFly� Rifle ARF Review | Bajora | High Performance | 135 | Dec 17, 2012 05:04 AM | |
| Subsonic Planes Fast Jet Power System Review | DismayingObservation | Electric Power Systems | 25 | Sep 09, 2010 10:32 AM | |
| Great Planes Electrifly XPD-8 EDF Flying Wing Brushed Electric Ducted Fan ARF Review | Mitch G | Flying Wings | 27 | Jul 25, 2010 12:59 AM | |
| New Product | Great Planes New EDF F-20 Tigershark | typhoonmaster | Foamy EDFs | 1 | May 08, 2010 12:25 PM |