
Comments (0)
Add Comment
-
 Views: 159
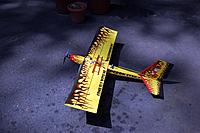
This graphic artwork from a free vector art site was the basis for all the flames on the Curmudgeon Stik. -
 Views: 175
All the artwork for the plane was created and laid out on scale drawings in Adobe Illustrator. -
 Views: 162
Once the art work was designed, files with individual sheets that fit my printer were created. Some decals would not fit the page and had to be split. -
 Views: 156
Masks were created and temporarily glued to the plane where a white background was needed under the decal. -
 Views: 174
Tissue was ironed to remove wrinkles. -
 Views: 162
Ironed tissue applied to a backing sheet with a very light coating of contact cement and then smoothed with a roller. -
 Views: 165
Printed decals removed from the backing sheet and ready for waterproofing. -
 Views: 151
Tail decals taped to the waterproofing frame and ready to be coated with acrylic spray.
Sticky:
The Curmudgeon Stik - Part I
-
 Views: 180
Parts for the box fuselage made from $-tree Adams board before glue-up and the solid Styrofoam nose section that slips inside. Paper has been removed from the inside surfaces and will be removed from the outside after glue-up. -
 Views: 153
Sides, bottom, and nose glued with formers installed to add strength to the box in the rear. -
 Views: 175
The electronics tray before it was glued in with receiver and ESC on top and battery underneath. -
 Views: 160
Electronic tray glued in. Wing hold-down skewers glued in and re-enforced on the inside. -
 Views: 134
Landing gear re-enforcement ply glued on and filter paper being cut for covering. -
 Views: 157
Fuselage complete and being covered in coffee filter paper. -
 Views: 166
Landing gear detail with battery access behind.

-
 Views: 193
The OB - Version1 -
 Views: 180
The CG mark on the wing strut visible here just didn't work for this build. -
 Views: 201
Newsprint and glue size provide a good surface for paint. An acrylic gloss or semi-gloss waterproofs the plane without adding much weight. The American Beauty is a modified Blu-Baby design by Tony65. -
 Views: 183
The new fuselage is not as glossy as version 1, but it is lighter and "cleaner." -
 Views: 213
The servos are both in the front cockpit. -
 Views: 221
The fuselage doublers in the front add strength without adding much weight, and the weight is in the nose at that. The modification for the short power pod can be seen just in front of the servos. -
 Views: 189
Barbecue skewers are used on both the leading and trailing edges of the spars in this build. -
 Views: 230
The first coat of paint being applied in the air brush booth. The coffee filters may absorb more paint than newsprint.

