Posted by B.Welwood |
Mar 08, 2020 @ 07:56 PM | 12,826 Views
By way of background...
Inspired by a cool video of a slope wing flying with LED lights, I decided to do something similar. As an addition to the initial kit build of my slope glider, the Windrider Bee2, I installed LED strip lighting on both the upper and lower surfaces. The battery power system was converted over to a 3 cell lipo to power the lights. All lights on draws 2 amps of power.
To activate the lights during flight, I wired switches to aileron stick movement. The top of one wing and the bottom of the other lit up as the aileron stick turned the Bee. Observers at the ridge remarked on how the Bee looked like an alien spacecraft.
Better things...
A while back, I was looking at doing some kind of an Arduino project, as a learning endeavour. It occurred that some kind of a redo of the Bee�s lighting system would allow for this. So I removed much of the existing setup to make way for a new setup. I selected a STM32 Bluepill board as the microprocessor to use. I had been running a KK2 board to provide gyro stability and decided to replace it with a Matek board running iNav software. The Matek provides 3 levels of power, 5 volts for the servos, 12 volts for the lights, and 3.3 volts to drive the STM board.
In addition to the software necessary to turn on and turn off the 4 individual light circuits, I needed a way to convert the microcontroller pin writes to drive the lights at higher voltage. The solution was to use logic level mosfets. I designed a compact circuit board to do this, but the first one did not work well enough. The second version did.
As a test of the new system, I flashed through software control the individual circuits at a frame rate of 50 ms or 20 times a second. Could the microcontroller keep up with this rate? Yes.
Here is a video of the test. For actual flying purposes, I will flash the microcontroller with a simpler pattern. The whole lighting system is controlled by a switch on the radio.
| TechnoBee (3 min 59 sec) |
Comments (0)
Add Comment
Posted by B.Welwood |
May 09, 2013 @ 10:36 PM | 13,815 Views
Finally get a notice that my package has arrived. So I hot foot it down to the local post office to claim my prize. Yessiree, another slope foamie kit.
Nice lady emerges from the back room with my package. OMG!
The box is so badly beaten up... holes all over and shreds of cardboard hanging off it, what the hell were those postal guys doing? Looks like it got skewered by a forklift or something. The counter lady even commented... "Gee... Hope there's nothing fragile in there..."
Get this ratty box home and open it up (real easy to do). Pleasant surprise, everything is intact. Nice job packing there Canuk!
Test fit of the pieces shows good moulding and engineering. While checking things out, I get an idea that might be fun to try with this project. First need to check out my inventory of spare parts.
Photos of build progress to follow....
Posted by B.Welwood |
May 05, 2013 @ 10:30 PM | 14,412 Views
Yard work completed. West wind forecasted for today so last night was spent charging batteries. Sad thing, my Super Seven is not salvageable, even with a fresh pack it persists in reporting a low batt.
Decided to start the season with my refurbished Zagi. I stripped off the tape covering, added carbon spars, new rx, and managed to fit in a 2000 mah flight pack. Turns out it flew OK but required an on inordinate amount of up trim to compensate for nose heavy with the big batt. It mushed around with excessive drag on the elevens, so will swap out the 2000 pack with a 750 and get the cg back at 8.25 in. Good to be flying that old friend again.
Tried a few throws with the Alula. This thing continues to vex me, I suppose more trimming and cg adjustment is required.
Came home with two intact airframes and a sunburn. All in all, a good day.

Posted by B.Welwood |
Apr 28, 2013 @ 09:55 PM | 13,827 Views
Spring is finally here. My building shop is in my unheated garage so therefore the building season is also about to begin.
I succumbed to the urge to purchase another airframe... What can I say... I'm an addict. Got an email that said purchase is on the way. Local hobby shop has the required servos in stock, another purchase trip scheduled for tomorrow. I need fresh CA too.
Still putting in time in PicaSim but seem to have "plateaued" on the learning aspect.
Final touches need to be applied on the Viper DLG but will plan to get the rust off with the Gambler first. Will try to record some video with the new camera.
Back hurts from yard work this weekend... Just need to power wash the deck, hose down the house siding and wash the windows and flying season can begin. I expect to wake up stiff tomorrow morning ( no, not that kind of stiff).
Nuff said for now...
Posted by B.Welwood |
Mar 21, 2013 @ 10:42 AM | 13,806 Views
I've been spending a little time on PicaSim trying to learn the use of rudder control in my slope flying. Since my early days, I flew mostly elevator & rudder (on the aileron stick) and most of my slope experience is with elevator and aileron control... you know... bank & yank. The rudder stick was mostly unused.
After some time on the sim, I got not too bad although smooth implementation of aileron and rudder did take some time to achieve. I still have to consciously think about what I need to do. I need much more practice.
The biggest challenge for me is flying the LeFish inverted on successive ridge passes and coordinating the aileron and rudder inputs, as the rudder is reversed during this type of turning. For some reason, I seem better at left turns (aileron stick to the left and rudder stick to the right), on the rights I suck big time. Also, my ability to "concentrate" on what I'm doing seems to last a finite amount of time. Getting old, I guess. I've already killed a few schools of fish practicing this.
Trying to bring this level of discipline to your flying gives you a whole new level of respect for guys like Laird, Lange, and Henderson. These guys make it look easy.
One thing that I have been doing is to listen to a playlist on my ipod while running the sim. I run about an hour's worth of songs and they vary in tempo, the slower tunes allow mental "recovery" from the faster paced ones. This is nothing really new as I understand a number of slopers out there listen to music while flying. Also, this is a good way of timing your sim sessions.
As I write this, we are in the midst of yet another raging Spring snowstorm.
Think I will take a nap before shovelling out the driveway again, I'm running out of places to put the snow. Maybe put a little more time on the sim this afternoon...
Posted by B.Welwood |
Mar 18, 2013 @ 01:51 PM | 13,428 Views
Finished up the annual chore of prepping the household income tax returns. For some reason this responsibility has been mine since ages ago.
Looks like I'll be getting a modest refund this year, e-file worked good and I've now got a couple hundred bucks to blow on the hobby.
Happened to visit Future Shop site next... what's this... a one-day deal on those nifty GoPro video cameras, plus 20% off on all accessories. Checked my local store... yessiree they had 3 in stock. Grabbed the Rabbit keys and headed over, lets see what do I need for accessories... one of those helmet mounts for sure, maybe an extra battery... see what's on hand when I get there.
Picked up the camera, a helmet mount kit, and a back-pack battery add-on. Spent the afternoon downloading manuals and software and figuring out how to run one of these. Oh SH*T! I forgot about a tripod mount. Looking through the stuff that comes with the camera, I find something that should work as a helmet mount. What to do about a helmet... checked the garage and found a bicycle helmet that should work fine. The camera mount fits it pretty good. (I look pretty dorky wearing it, but I don't care about that stuff anymore). Next, went to charge the add-on battery pack and find it is DOA. No problem, that pack makes the camera too bulky and heavy for a helmet cam anyway. Back to the store I go. Return the battery pack and helmet mount kit and pick up an extra battery, tripod mount, and micro SD card. All set. Here's a photo of the cam mounted on the helmet.
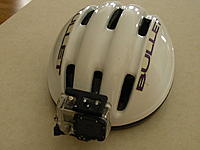
The camera mounts up to my tripod just fine, now time to shoot some test video.
I decided to do a bit of a demo video of the LeFish build.
Here are the results... (an HD video, no less)
Now I am all set for shooting some flying video at the slope this year.
Looks like I'll be getting a modest refund this year, e-file worked good and I've now got a couple hundred bucks to blow on the hobby.
Happened to visit Future Shop site next... what's this... a one-day deal on those nifty GoPro video cameras, plus 20% off on all accessories. Checked my local store... yessiree they had 3 in stock. Grabbed the Rabbit keys and headed over, lets see what do I need for accessories... one of those helmet mounts for sure, maybe an extra battery... see what's on hand when I get there.
Picked up the camera, a helmet mount kit, and a back-pack battery add-on. Spent the afternoon downloading manuals and software and figuring out how to run one of these. Oh SH*T! I forgot about a tripod mount. Looking through the stuff that comes with the camera, I find something that should work as a helmet mount. What to do about a helmet... checked the garage and found a bicycle helmet that should work fine. The camera mount fits it pretty good. (I look pretty dorky wearing it, but I don't care about that stuff anymore). Next, went to charge the add-on battery pack and find it is DOA. No problem, that pack makes the camera too bulky and heavy for a helmet cam anyway. Back to the store I go. Return the battery pack and helmet mount kit and pick up an extra battery, tripod mount, and micro SD card. All set. Here's a photo of the cam mounted on the helmet.
The camera mounts up to my tripod just fine, now time to shoot some test video.
I decided to do a bit of a demo video of the LeFish build.
Here are the results... (an HD video, no less)
| New Project 2 (11 min 6 sec) |
Now I am all set for shooting some flying video at the slope this year.
Posted by B.Welwood |
Mar 12, 2013 @ 12:58 PM | 13,465 Views
Got a kit last Spring after following Surfimp's thread for awhile. Decided to go with a FF stab instead of the Mad flippin type, and hoped to come in at a sub 20 ounce weight. Also wanted a 2 piece wing and removable stab for storage and transport ease.
Couple of pics...
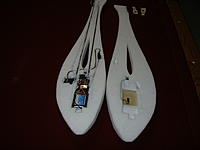 Radio stuff, pushrods and elevator gyro installed.
Some details around the pivoting platform for the stab...
 ...Continue Reading
Couple of pics...
Radio stuff, pushrods and elevator gyro installed.Some details around the pivoting platform for the stab...
...Continue Reading
- User Lists


