Archive for May, 2011
-
 Views: 313
A very simple way to manage the foam board disk spacing using foam cups. The stringers are bamboo parts from a curtain made of the wood. Cheap and strong "stringers". -
 Views: 277
An effective way to ensure the foam disk doesn't move while the glue is setting. I used a square tool to ensure a straight assembly. -
 Views: 302
The Bristol M1 fuselage will be almost 36" long when finished and completed in the "Toon", or Toonish style. If I do another, it will be much fatter to look more Toonish. -
 Views: 307
The 34" fuselage nearly ready for the pre-rolled FFF skin. I used a large diameter PVC pipe section and a heat gun to roll the FFF. -
 Views: 240
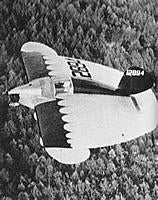
A museum restoration of the Bristol M1c in all it's glory. Notice how flat the propeller cone is. -
 Views: 477
Another view of Don Green's Bristol M1c from a paper model plan. -
 Views: 238
This is a paper model plan glued to thin foam and constructed as a flyable model by Don Green. -
.") Views: 237
Views: 237
Don Green's work is very informative and shows well how to use paper model plans to make a TFPF (thin foam park flyer).
Comments (1)
Add Comment
-
 Views: 269
One side is sheeted, but you can see the minimal supports of foam with thin balsa sheeting on one side for stiffness. The balsa is the most expensive material of the build. -
 Views: 229
Another view of the MFPB system using FFF as the primary construction material. The side of the FFF with writing is always interior since the other side has a thin plastic film that is not removed. -
 as the hinge material.") Views: 221
Views: 221
Another view for details of the MFPB system. So far I may have $5 invested and the airframe is super light/lite. The bottom half of the elevons are attached with HMG (hot melt glue) as the hinge material. -
 Views: 200
The very popular motor for the light park-flyers, especially for the build up FFF types. -
 Views: 200
Starting to apply the DAP Light Weight Spackling and Minwax Polycrylic mix. I added a bit of orange coloring for plastic resin. -
 motor.") Views: 211
Views: 211
Cut open the section for the future installation of the ESC and battery compartment. Will use 6 gram servos and a Blue Wonder (1500 kV) motor.
-
 Views: 247
The old NutBall with it's first damage scare. When I made a turn the craft would nose dive, even if the COG seemed near perfect. Moving the battery pack did help the COG problem. -
 was broken in three places.") Views: 223
Views: 223
More damage and due to the tendency of the flyer to nose dive on turns. I had not noticed the front carbon fiber strip (1mmx3mm) was broken in three places. -
 Views: 200
EPP foam tends to tear a lot easier than I first believed. This craft is made from 6mm thick sheet of the 1.9 lb variety, which is a little heavier than most other foam types. -
 Views: 212
A better picture of the damage to the front end of the EPP foam. EPP foam is very flexible, but it tends to tear between the foam balls, at the surface of each.
-
 Views: 384
The KFm on top is 3/4" thick styro-foam board shaped using 80 grit sandpaper. The hardware box was made from 3/4" blue foam board. -
 Views: 268
The park flyer was a 20" NutBall before the modifications, which included a 40% step fashioned from "pop-corn" styro-foam board. Styro-foam suggests 40% of the front part of an airfoil. -
 Views: 281
Sharpe markers were used to add color to the bottom of the RC flyer. The two servos are no-name and 9 gram. The 6mm EPP wasn't thick enough to prevent the need to cut through. The orange color is spray paint. -
 Views: 252
The "SnowBall" style landing gear was made from layers of 3mm EPP foam sheet using GG, but tend to break on hard landings. The two dots are "ball" pegboard map pins to mark the COG. The map pins are glued in place. -
, 10 Amp ESC, 800 mAh 2s battery pack, and a 8x6 propeller. The motor mount is thin, round craft wood (package of shapes) and has had a number of modifications.") Views: 246
Views: 246
The "Arupy" park flyer uses a "Blue Wonder" motor (1500 kV), 10 Amp ESC, 800 mAh 2s battery pack, and a 8x6 propeller. The motor mount is thin, round craft wood (package of shapes) and has had a number of modifications.